Okta Workflows
No Code Automation
Asset Management
Atlassian Assets
Using Atlassian Assets with Okta Workflows for asset management
by Bilal Habib
Mon Oct 24 2022
Introduction
Note that Atlassian Insight is being renamed to Atlassian Assets.
At made.com we use Atlassian Assets for asset management. This wasn't always
the case. We used to use Google Sheets as a source of truth for all of our asset
management. This did not work. We had many problems with it, and over time we tried
different solutions. Eventually, our security team found Atlassian Insight and started
using it for their assets. Their experience turned out so great that we decided to trial
Atlassian Insight for our IT asset management. It brought us great benefit, such as
splitting the assets down into different objects, an object for hardware and an object
for the owners 'People'. This helps to solve a problem, such as tracking down what
devices someone owns and having an easy history overview.
In this blog I'll showcase how we use Okta Workflows to generate a 'People'
asset. In Atlassian Assets you can link objects with other objects, so in our case we
can link a People object with an object defined for a laptop. The possibilities are
endless. At MADE we also consider contracts and risk owners as assets as well.
For example here is the graph of my 'People Object':
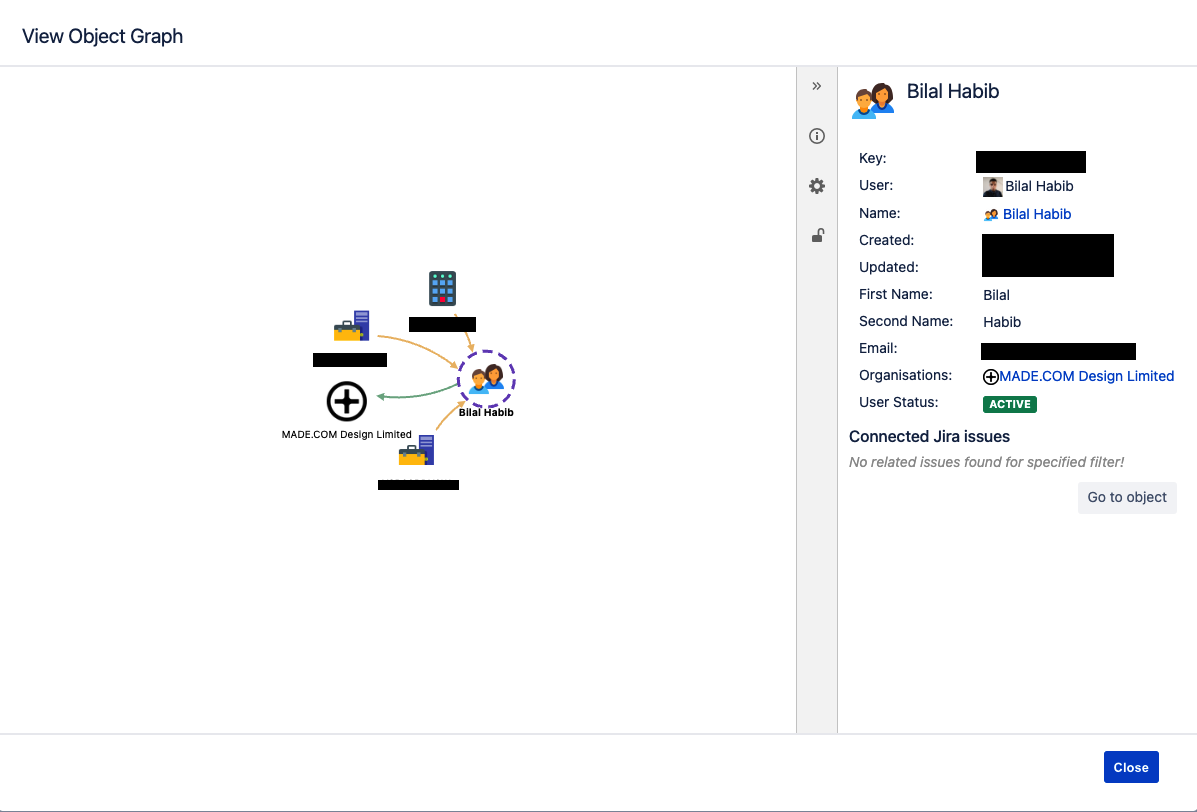
Here you can see my 'People' object linked to 2 work laptops, my access card, and my organisation. You can also see my status. The possibilities here are endless.
By the end of this guide, you'll have Okta Workflows setup to create 'People' objects for new Okta users. Update 'People' objects when an Okta profile (eg name change) is updated as well as disabling Okta users results in the 'People' object being marked as inactive.
To set this up you will need the following:
- Atlassian Asset subscription
- Atlassian API access
- Okta Admin specifically access to Directory modification (for adding a profile attribute)
- Okta Workflows
- Postman
I am also assuming you have moderate to intermediate experience with Okta Workflows, and no experience with the Atlassian Assets API.
Files to download
Sanitised Okta Workflows flopack
Atlassian Assets
Setting up your People object schema in Atlassian Assets
What is an object schema?
Global Reference Configuration
We need to setup something called Global Reference Configuration which will be used later on.
-
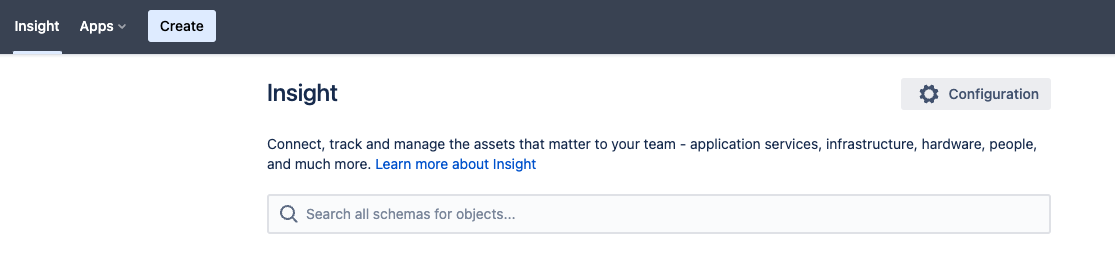
In Atlassian Assets click on 'Configuration'
-
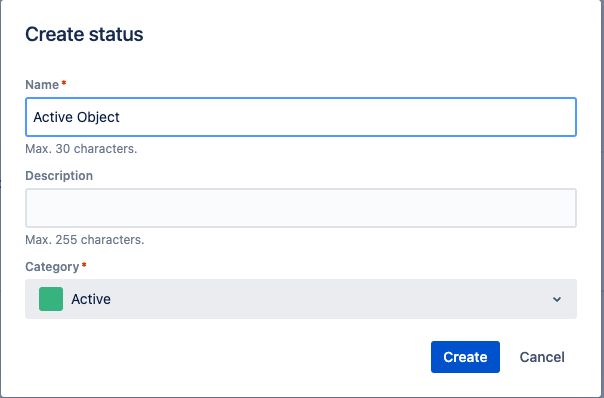
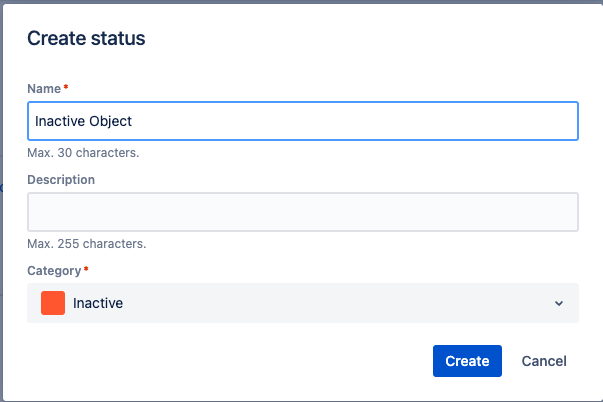
Go to 'Global Statuses -> Create a status' and create a status for the 'Active' category. Do the same for 'Inactive'.
Creating the People object schema in Atlassian Assets:
-
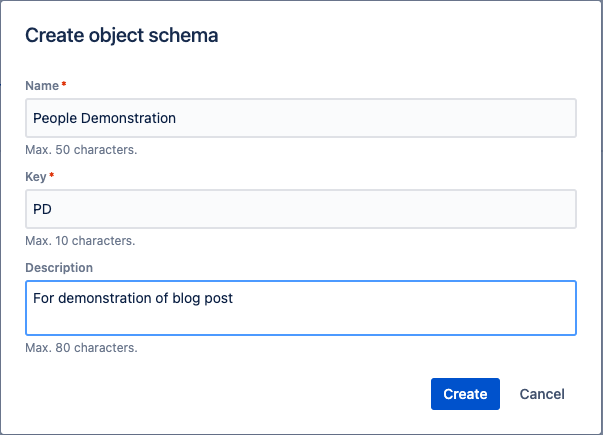
In Atlassian Jira Service Management navigate to Atlassian Assets and click 'Create object schema'.

-
Enter the details for your object schema, you should call it 'People Demonstration' as that is what I'll reference in Postman.
-
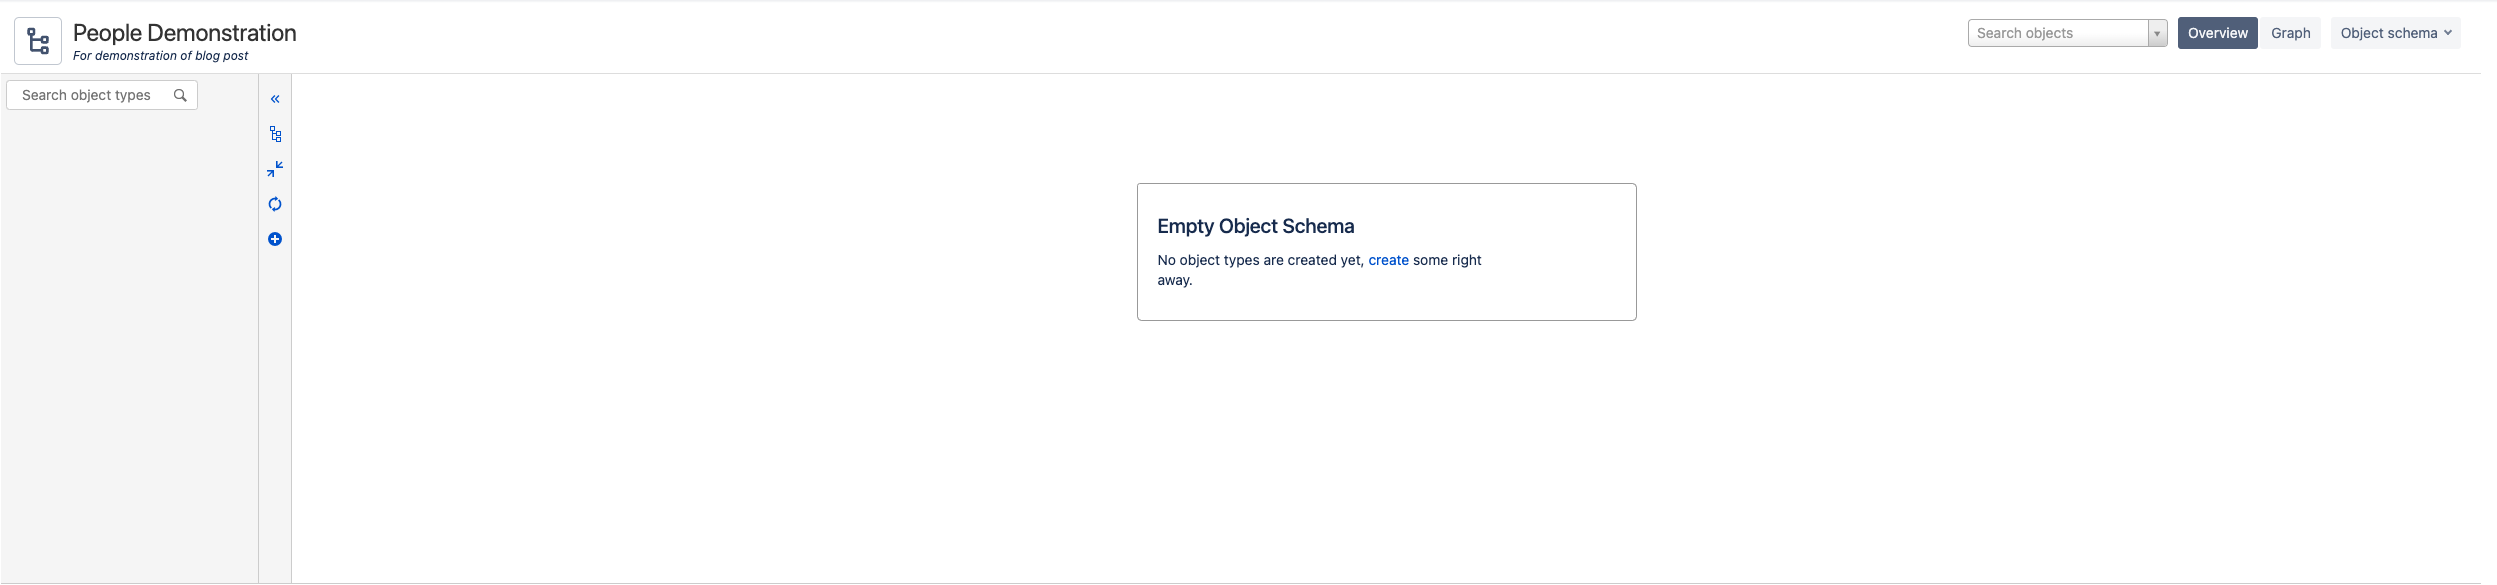
Browse to your object schema.
-
Here you will want to create a parent object type.
-
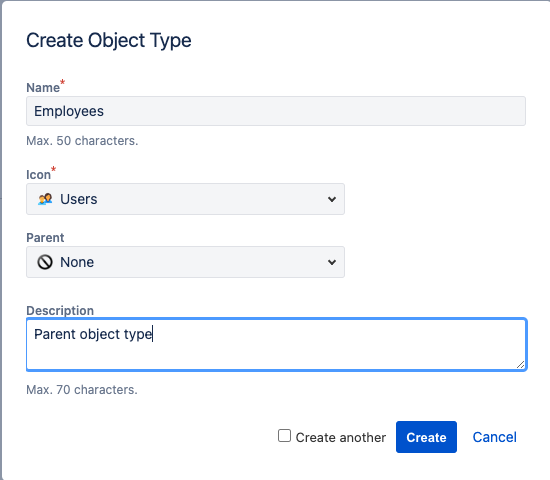
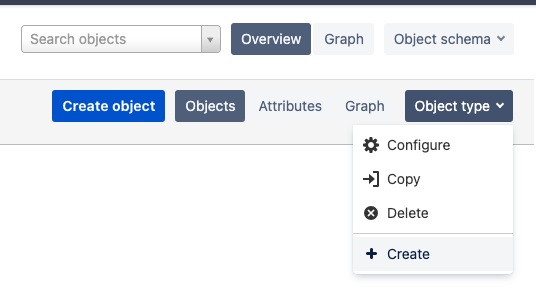
Click 'Object Type' -> 'Create'.
-
Create the object type.
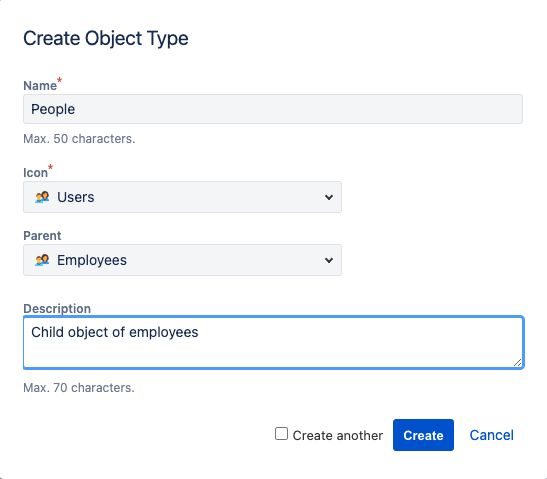
-
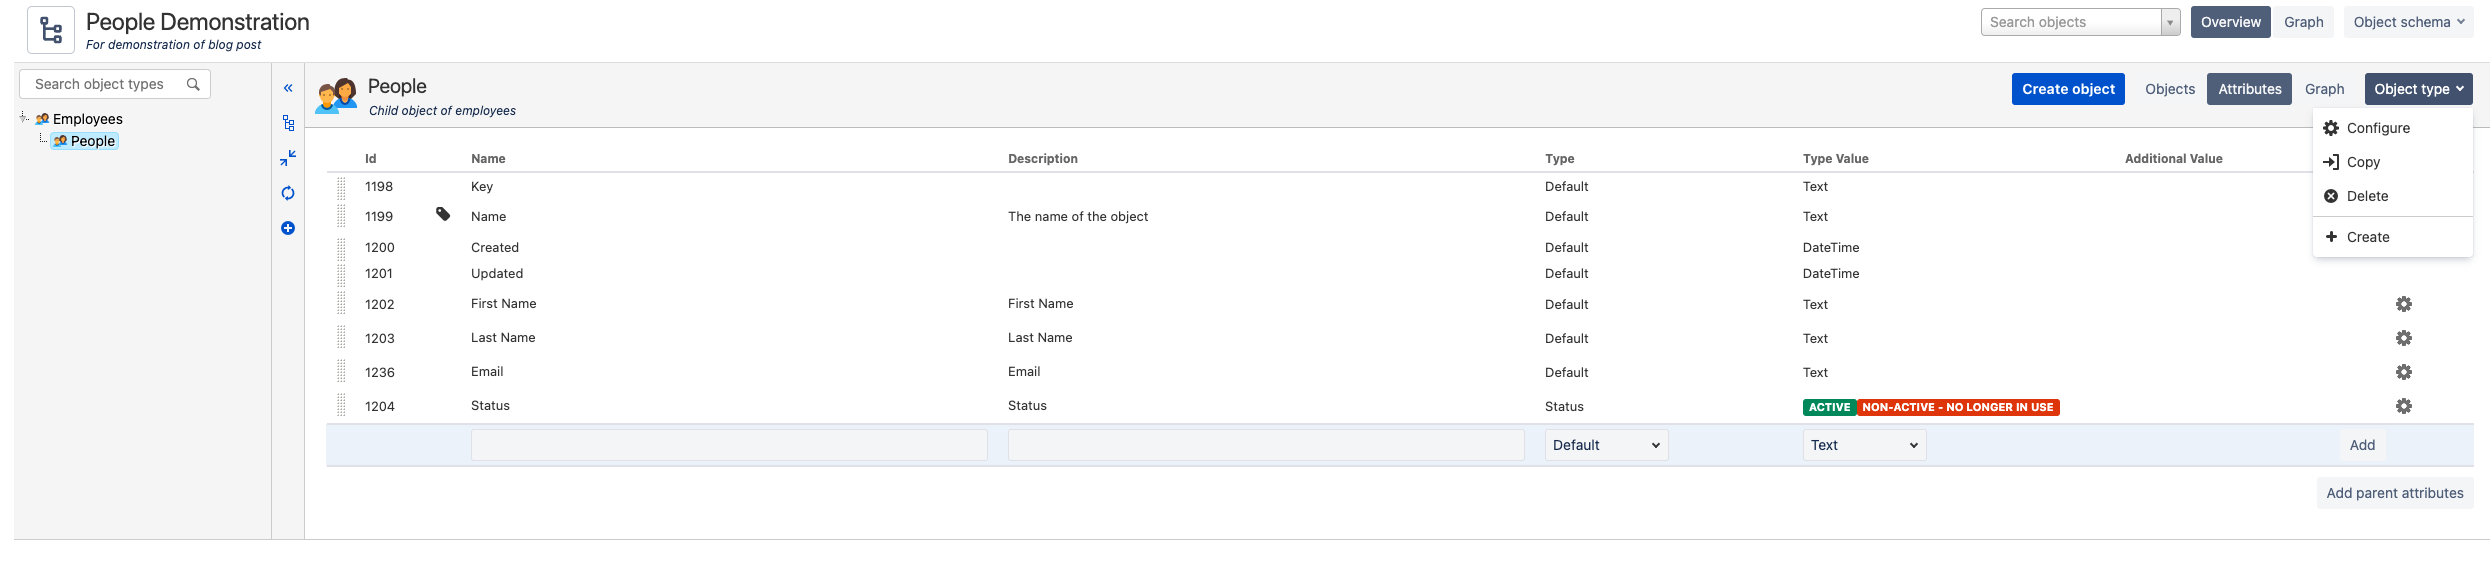
Click on 'People' and 'attributes'. As you can see we don't have many attributes defined so let's add some.
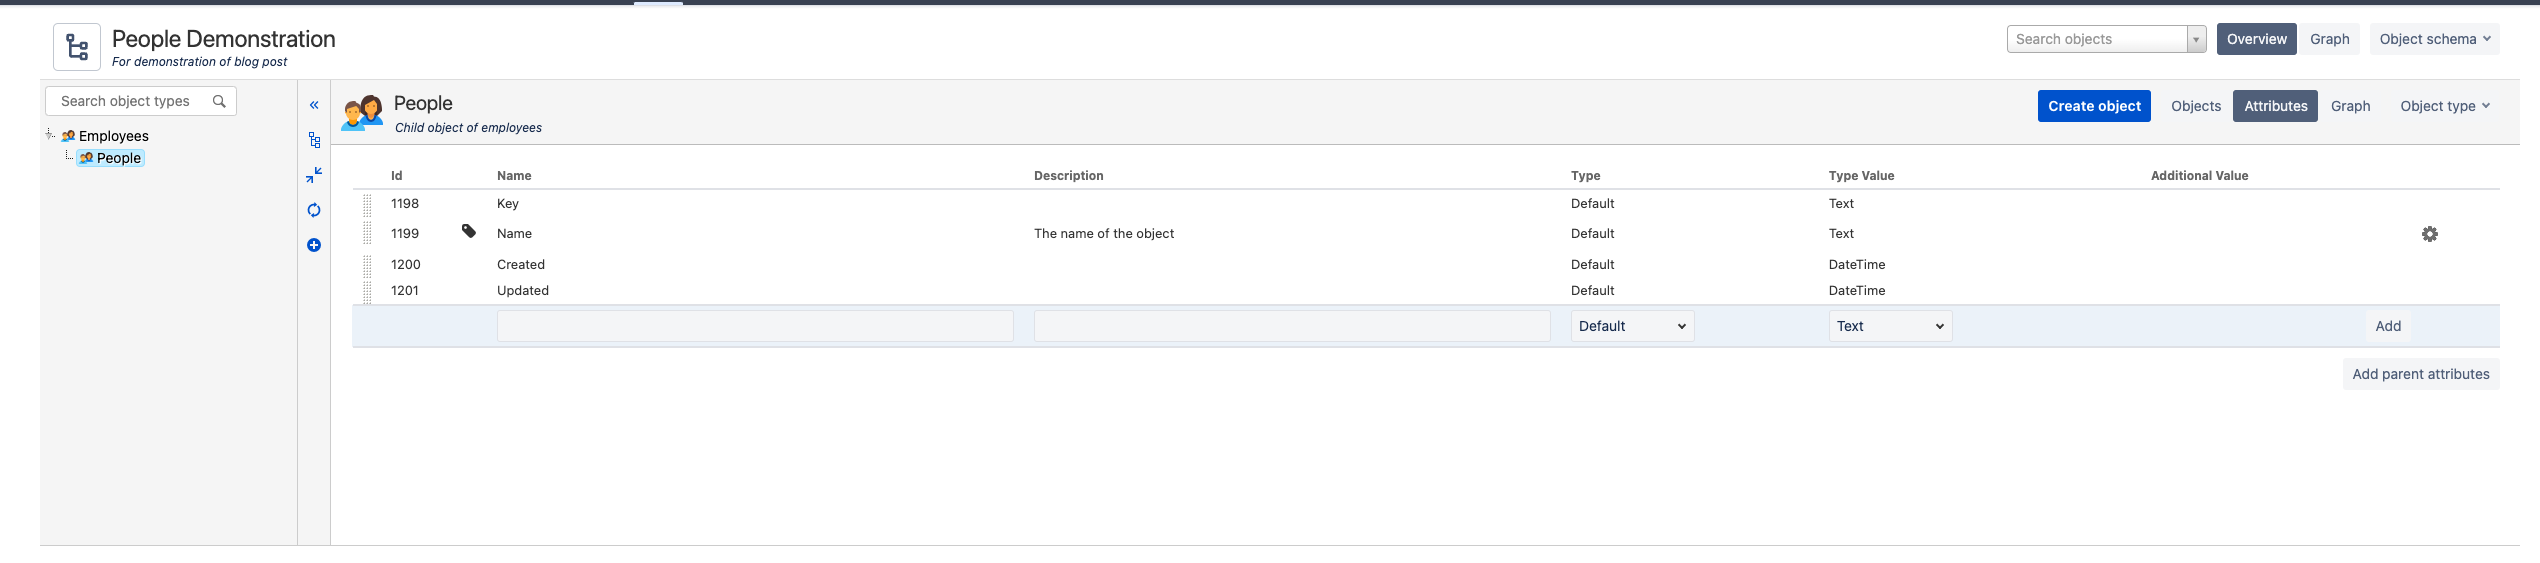
-
Add 'First Name, Last Name, Email' attributes with the type text.
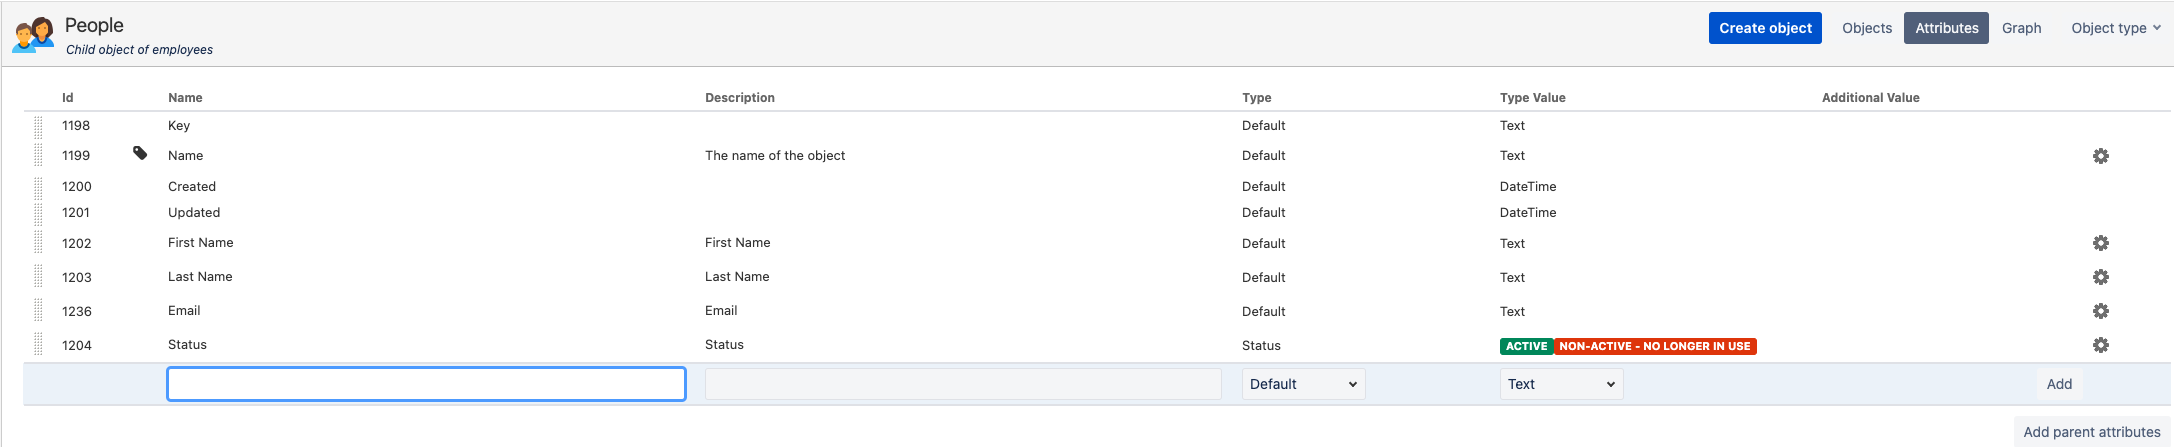
-
Add a status attribute with the type 'Status' and use 'Active' & 'Inactive' for type value. This is what you setup in the 'Global Reference Configuration' section.

-
Create an example object detailed as below.
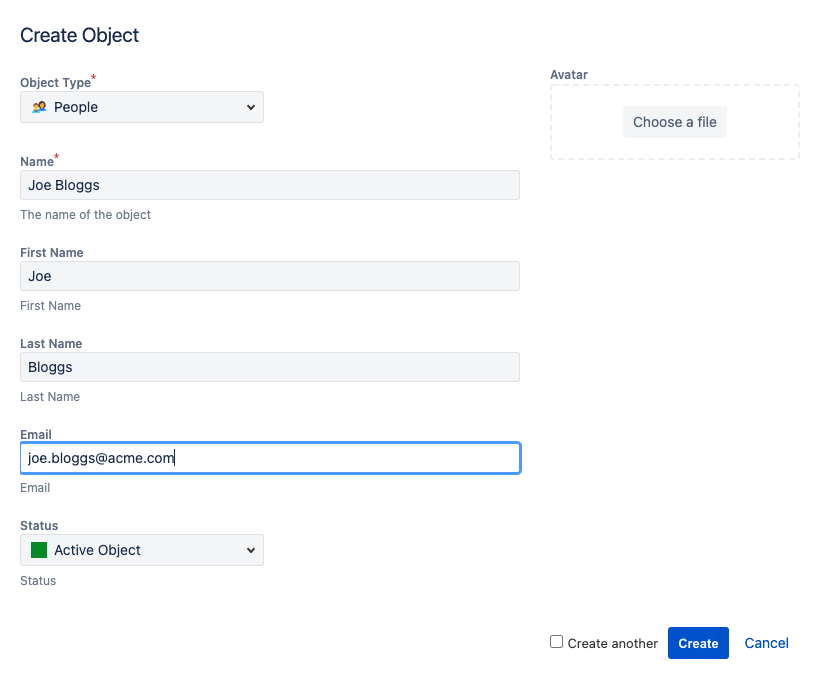
-
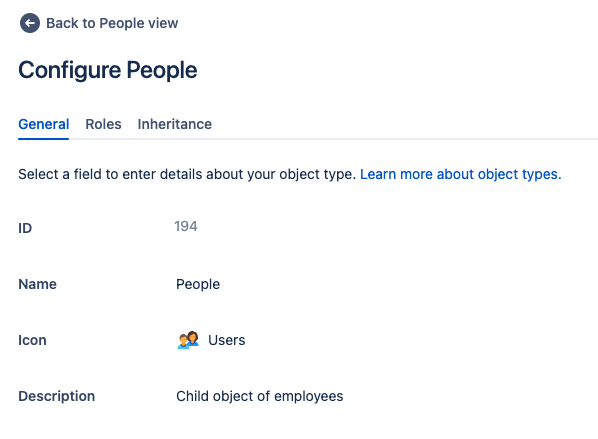
We need to find out the 'objectTypeId' value for later on, this corresponds to the type of object. Navigate to 'People -> Object Type -> Configure' and note the value for 'ID'.
Atlassian API
API Access Setup
Now that we have our object schema created we need to setup the API access so we can find out some key information.
Follow this
Atlassian Guide
on how to setup API Access
Using the API
Attached is a set of Postman requests we will use to find:
- The Workspace ID
- The Object Schema ID
- The values for the attribute 'status'
Lets go over the Postman Collection:
-
Before you import the requests we need to setup an environment in Postman with our Atlassian API credentials
-
In your environment create the following variables as secrets 'username, apikey, workspace_id & object_schema_id'
-
In your environment create the following variables as default 'assets_baseurl' as 'https://api.atlassian.com' & 'atlassian_baseurl' as 'https://yourdomain.atlassian.net'

-
Import the attached requests into Postman
-
The first request we need to run is the 'Find Workspace ID' request, this request contains a script which will set the first workspaceID in the JSON body as an environment variable. We will use the workspaceID later on

-
After running the 'Find Workspace ID' request you will see that a new environment variable 'workspace_id' is populated in your Postman Environment, keep this safe. The test in the request saves the WorkspaceID to a variable in your Postman Environment.
-
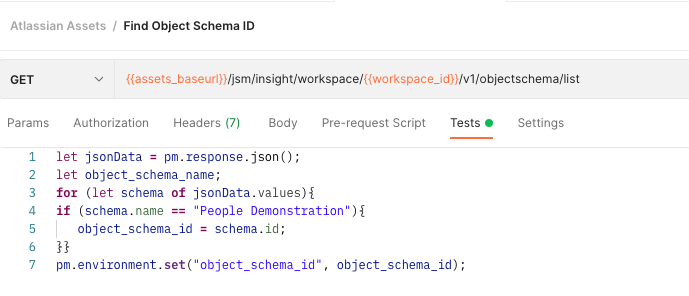
Run the request 'Find Object Schema ID', this request uses the WorkspaceID from the previous request. This request will also loop through the response until it finds an object schema called 'People Demonstration'. Adjust as needed in the tests section if you chose a different name for your schema. Once the request is complete it will save the ID of the Object Schema matching 'People Demonstration' in your Postman environment.
-
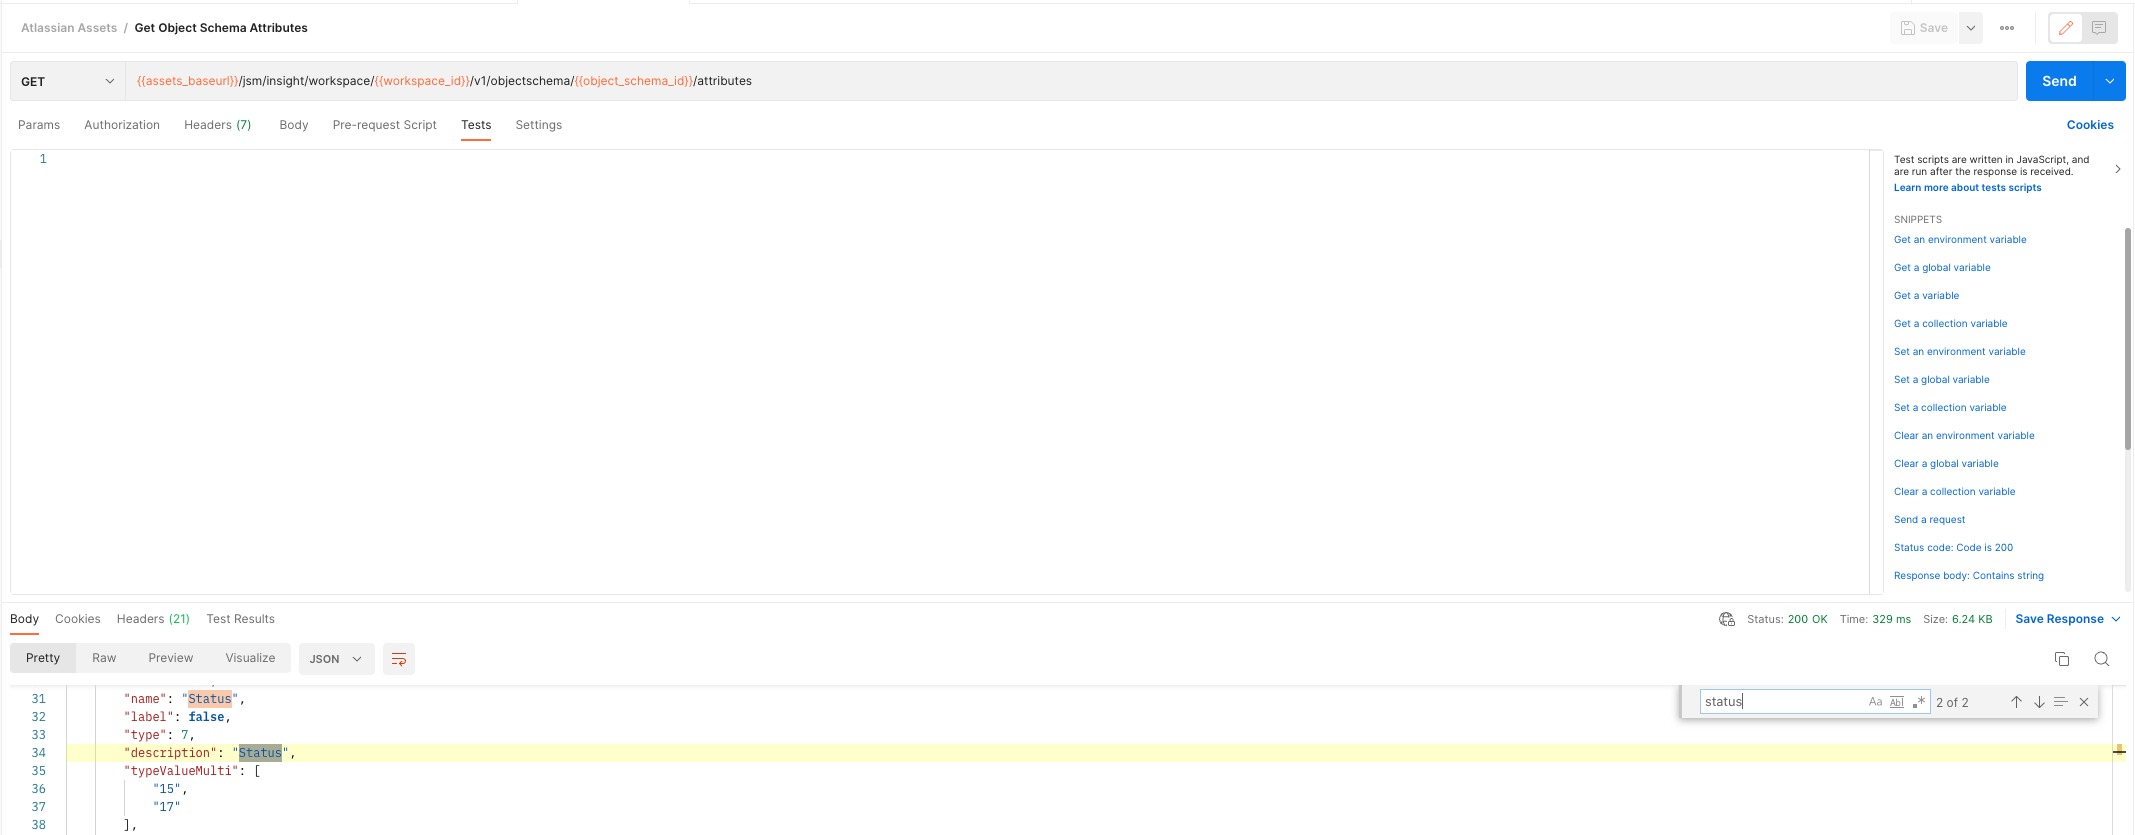
Next up run the request 'Get Object Schema Attributes', this request will pull all the attributes for the Object Schema you created. So in the response body you will see 'First Name', 'Last Name' & etc. We are interested in the 'Status' attribute since it doesn't use free flow text and we will need to use a certain value to mark an object as 'Active Object' or 'Inactive Object'. In the response body search for 'status' and then look for the array values of 'typeValueMulti'. In this case '15' is equal to active, so '17' must be equal to inactive. Note this will be different for you.
-
If you're interested then you can run the request 'Get Object' and see just how much information you get back, you need to specify the unique key of an object in your request.
 >
>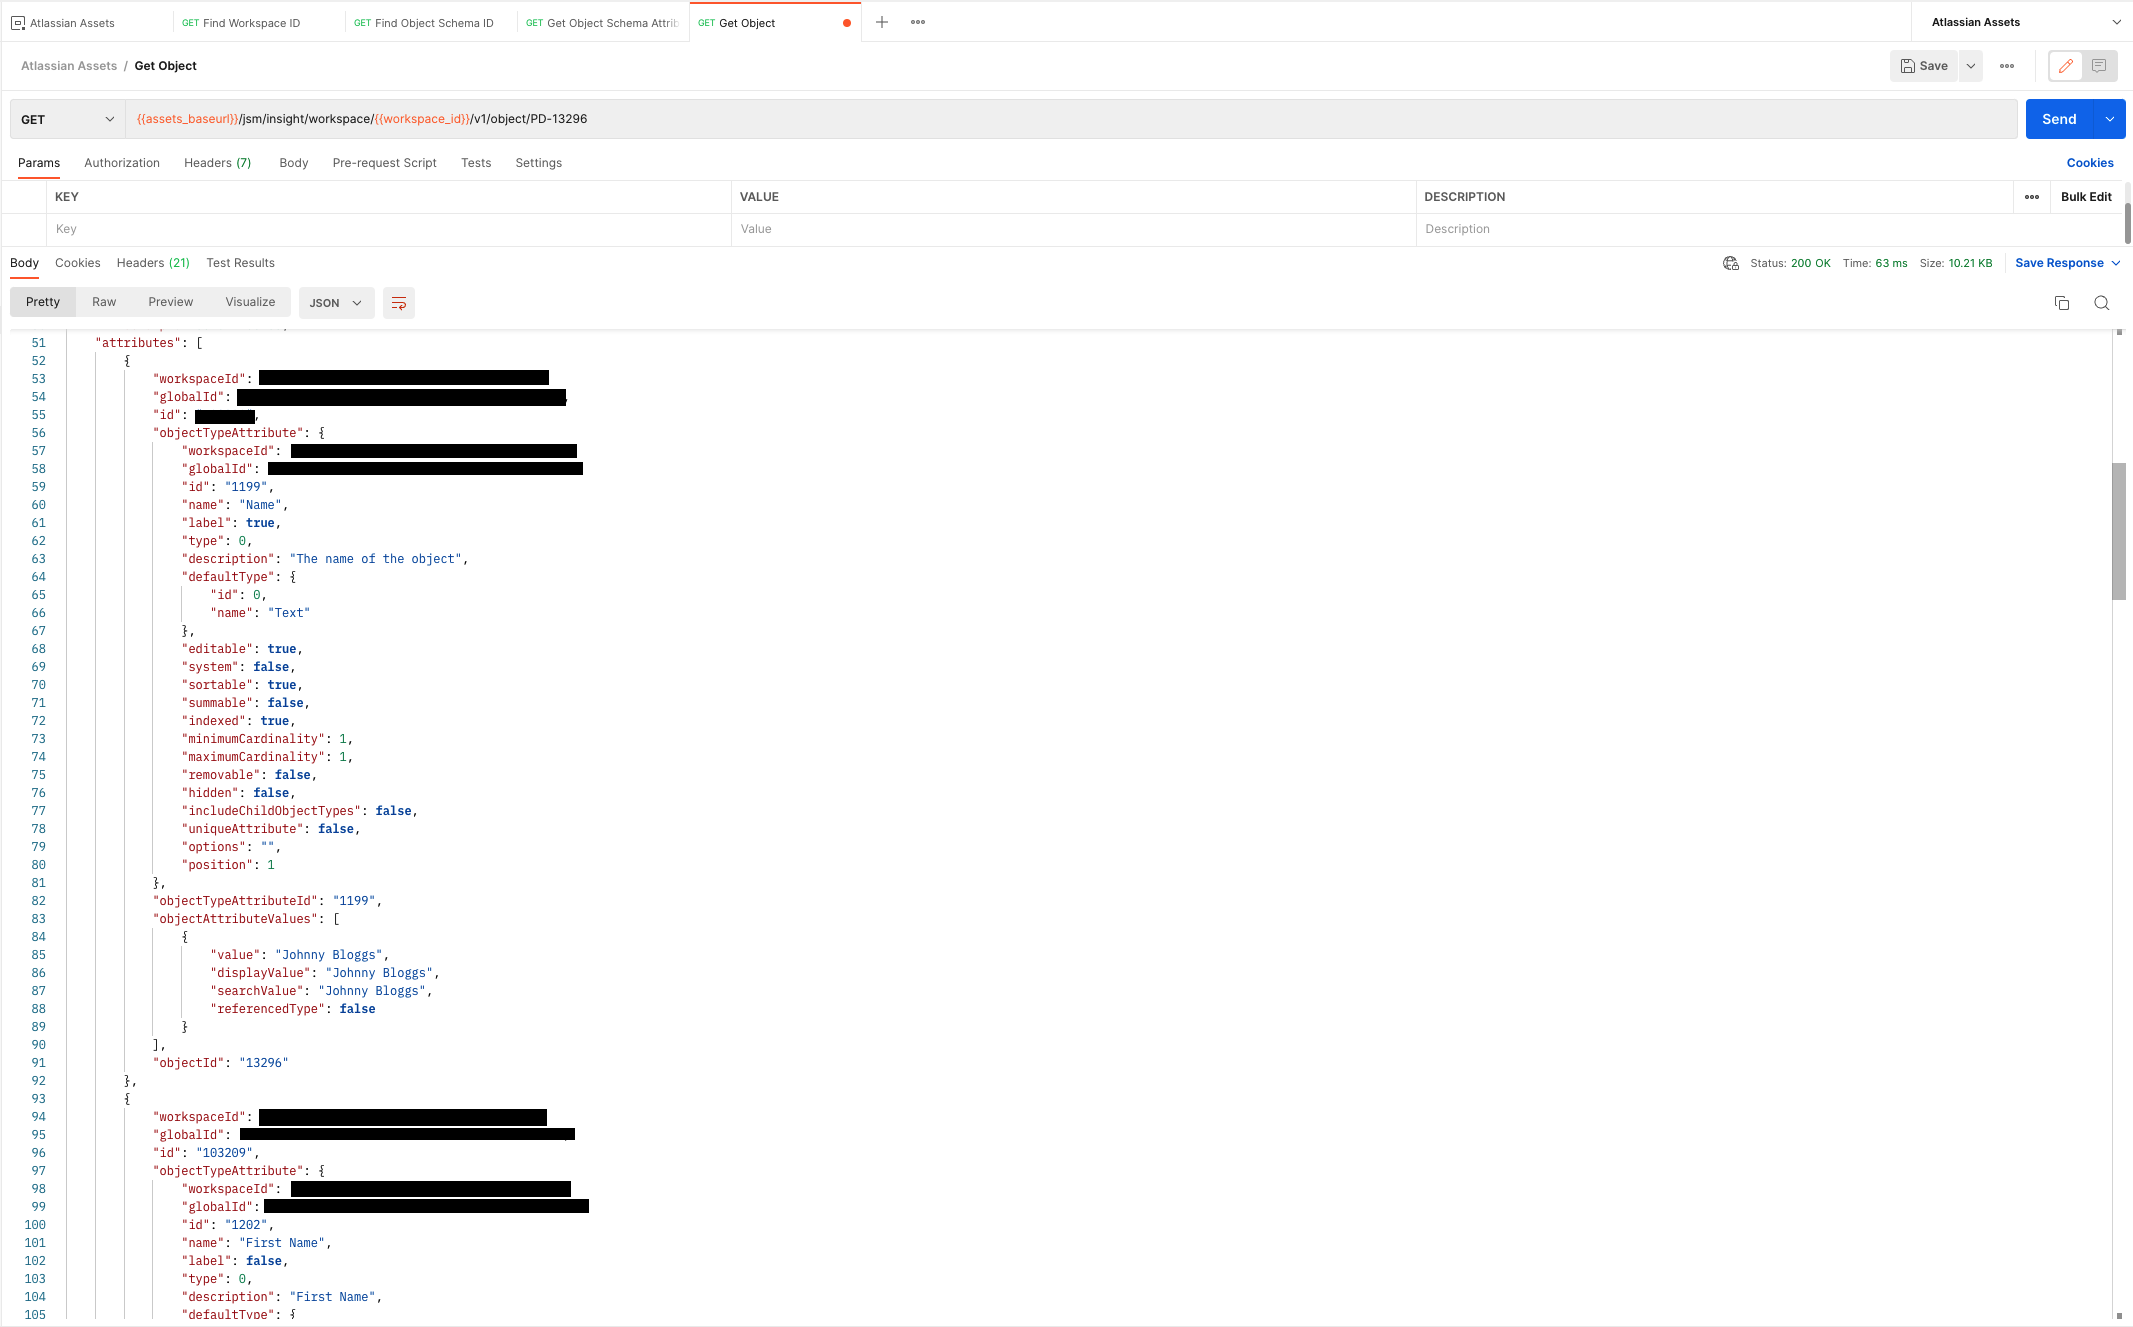
Okta Setup
We now have everything we need from the Atlassian Assets API. So now we can move onto Okta. You're going to need to have admin permission to create attributes in the Okta directory profile.
-
In Okta Browse to Directory -> Profile Editor -> Okta.
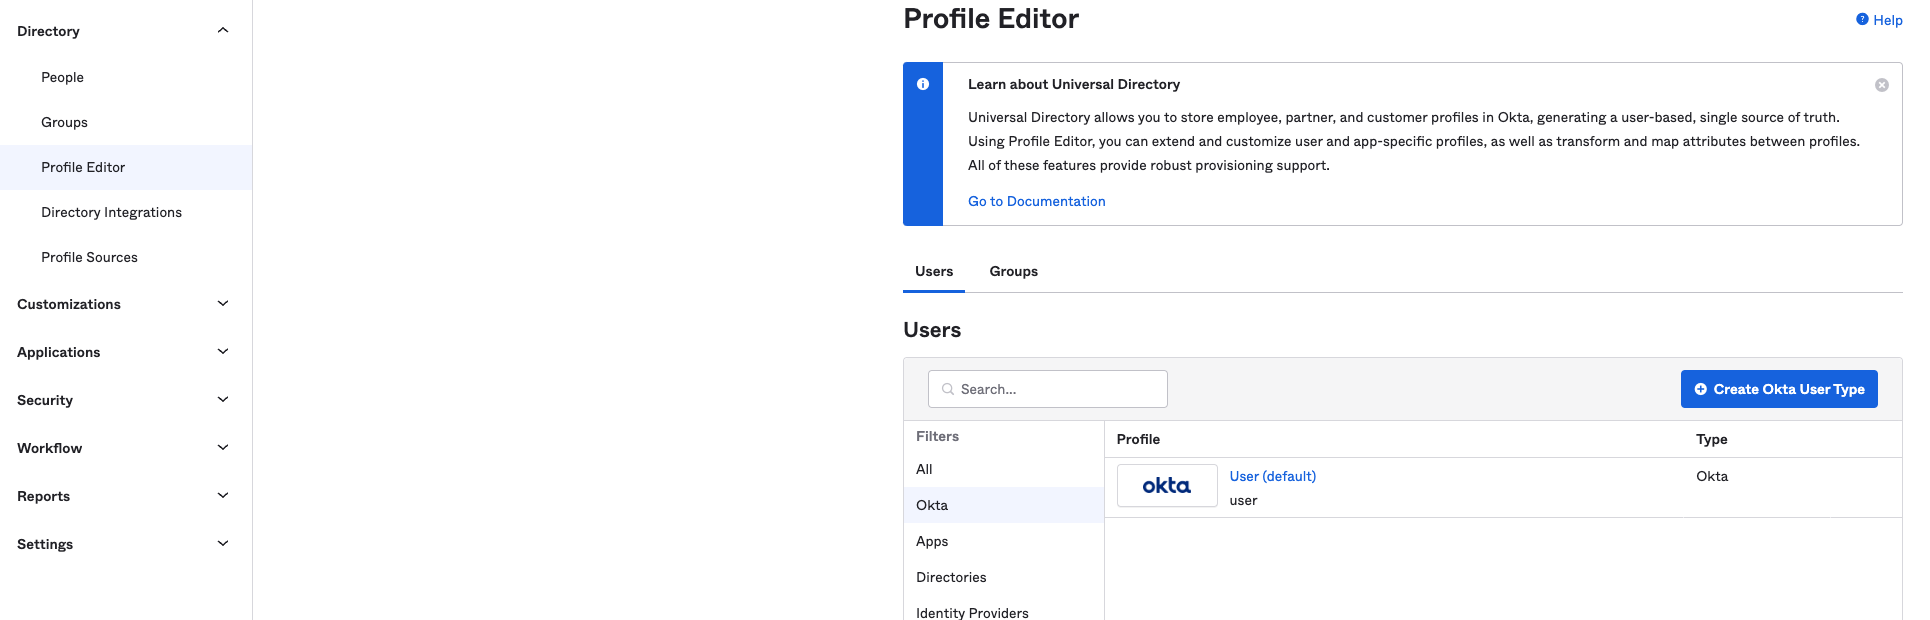
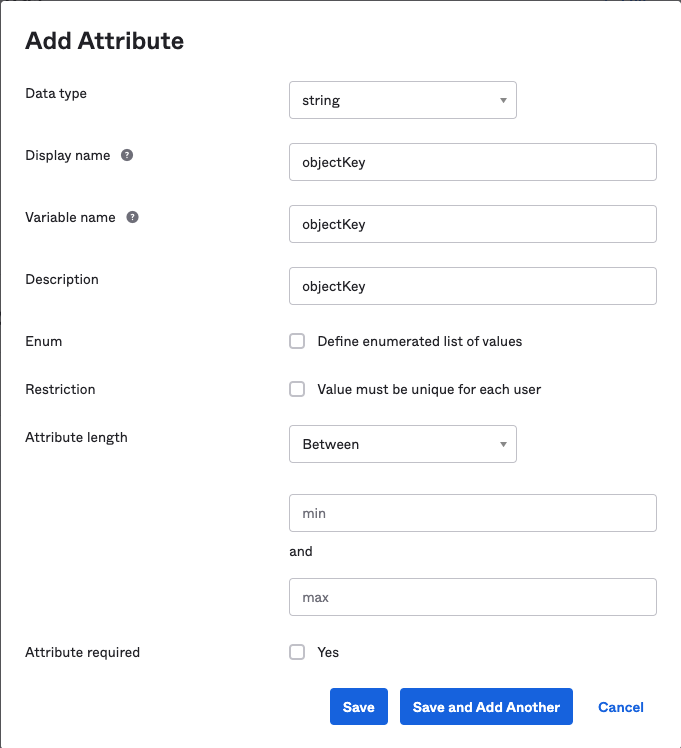
-
Create a new attribute with the type string, the rest is up to you. Remember the value constraints. For ease of use I am going to use objectKey as variable and display name.
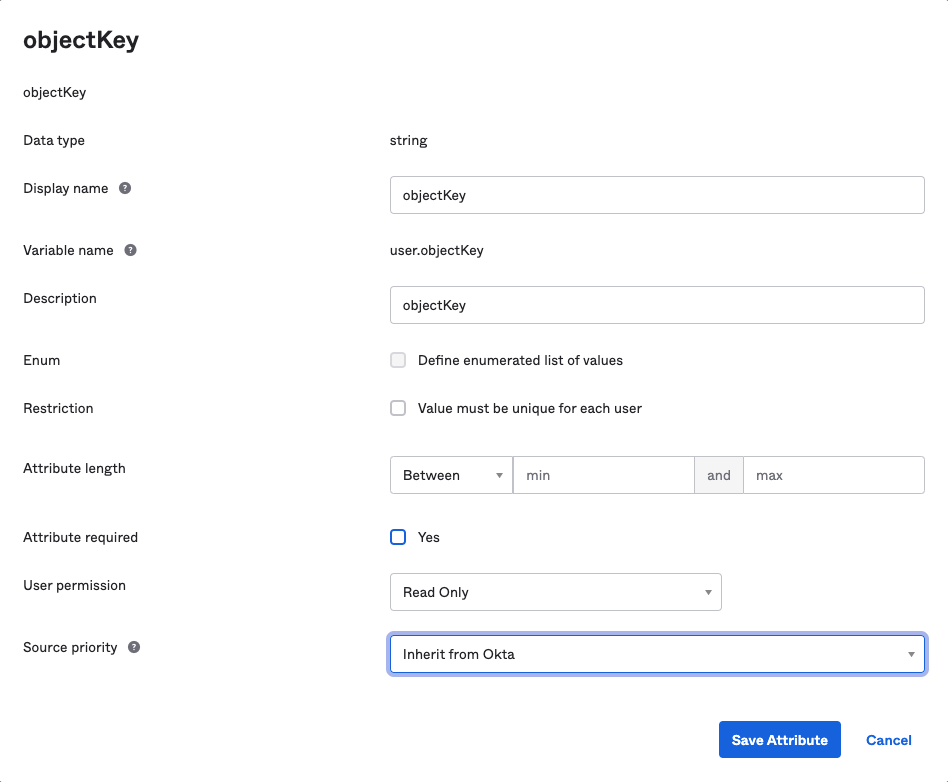
-
If you are using a directory system in Okta as your source of truth then you need to use Attribute Level Mastering to override your directory from sourcing this new attribute. Click edit on your new attribute and change 'Source Priority' to 'Inherit from Okta'.
Okta Workflows Setup
Now we need to setup our Okta Workflows for interacting with the Atlassian Asset APIs.
We will need to create a connector for the Atlassian Assets API. I am assuming you
already have a working Okta connector so I won't go over that.
Atlassian Assets Connector Setup
-
In Workflows go to Connections -> New Connection -> API Connector.
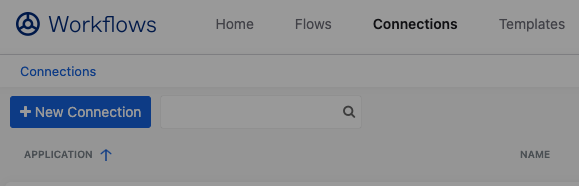
-
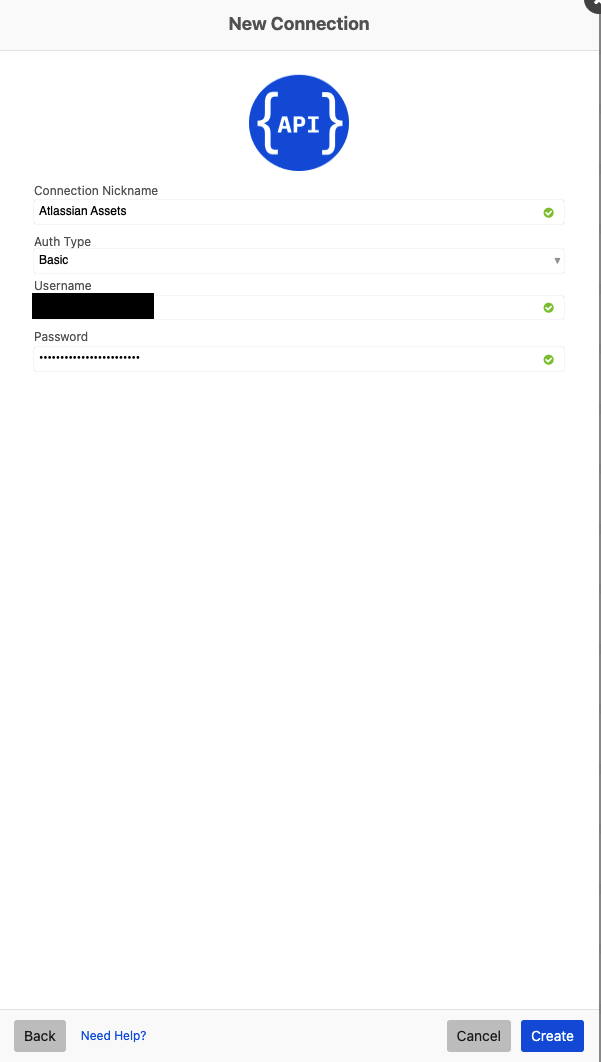
For the Connection Nickname use something memorable.
-
For the auth type choose 'Basic' then enter the API username (username of the Atlassian account) and password (API token of the Atlassian Account). Then press create.
Workflows Setup
Now we can start setting up workflows to interact with the APIs. Upload the flowpack into an empty Okta Workflows folder from the download section of this blog post. Whilst writing this blog I redesigned our internal flows that we use for Atlassian Assets. As a result each flow is now modular and act as functions. This way I can return values to the parent flow.
I'll go over each workflow below.
-
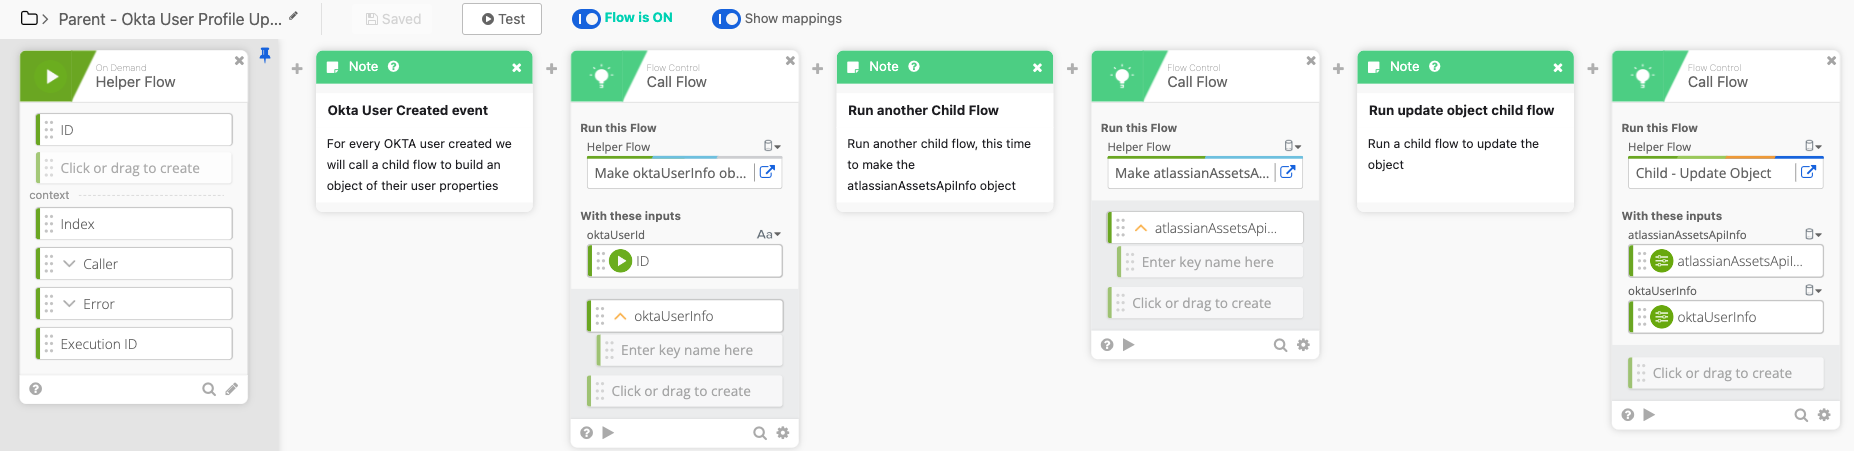
Parent - Okta User Created:
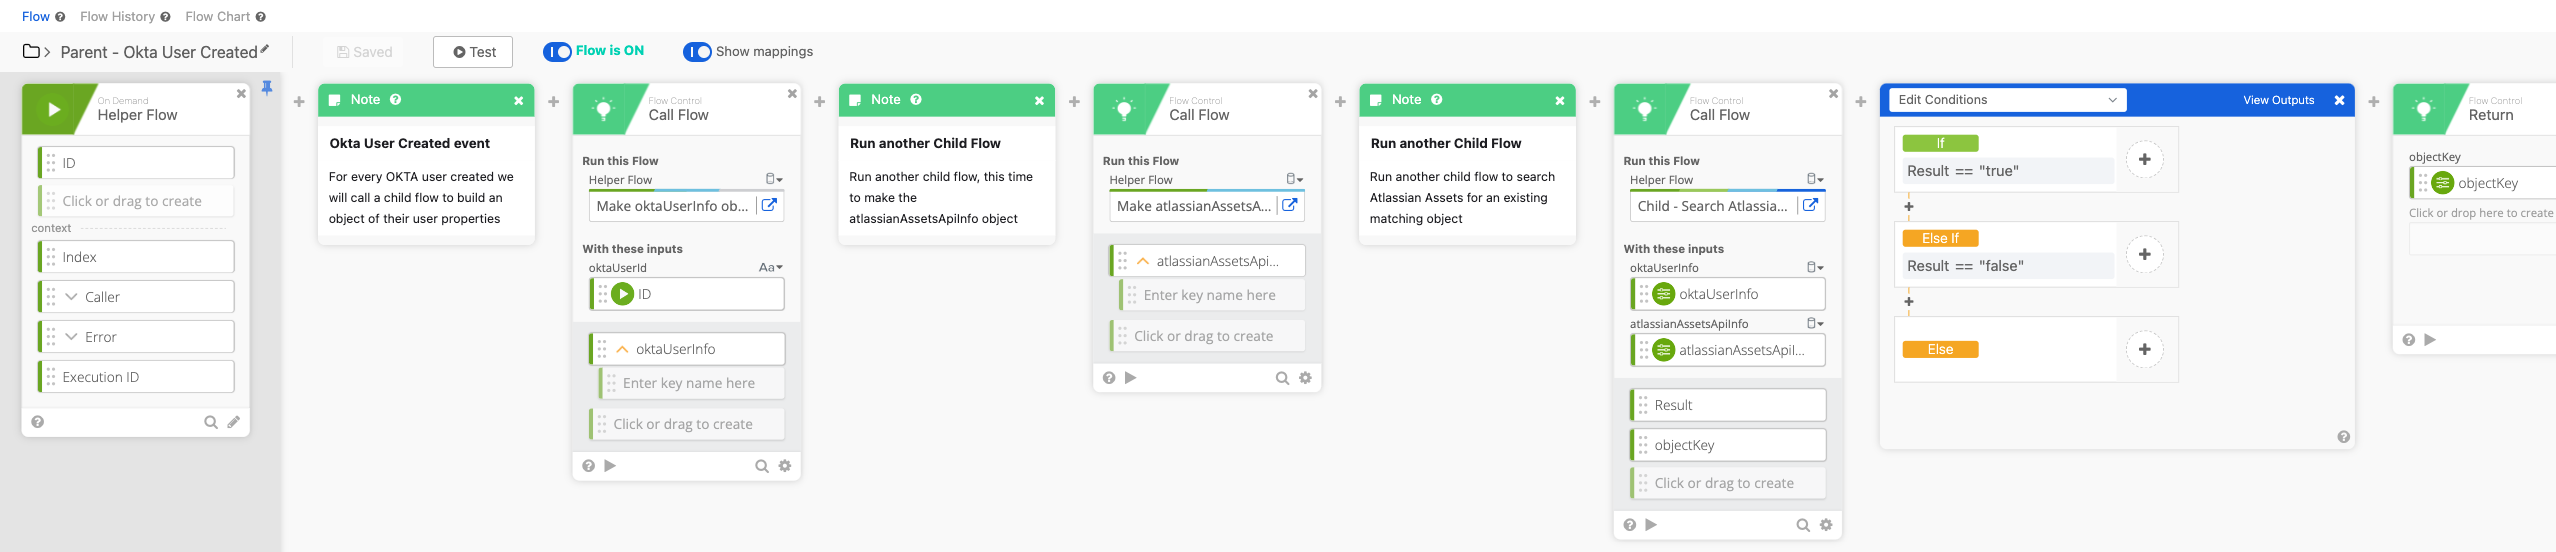
In this flow we are using the helper flow event card. Ideally what you want to do is create a new 'Call Flow async' card in your main workflow where you use the Okta event trigger for new user created.
The first 2 flows helpers generate 2 objects which are used in other flows. In the 1st of these calls the Okta User ID is inputted, this is used with an Okta Read User card to get some information from the user. In the 'Make atlassianAssetsApiInfo object' flow an object is returned with information about the Atlassian Assets api.
After that we call another helper flow called 'Child - Search Atlassian Assets People Objects'. We input both objects that we have just returned from the 2 helper flows. This flow will search Atlassian Assets for any matching objects based on the username of the Okta user.
If any search results matches are returned then the boolean 'true' is returned for Result as well as the 'objectKey' of the first object in the search results. This flow is used because we might already have an existing object.
If no search results are returned then the boolean 'false' is returned for Result and 'objectKey' is set to 'null'.
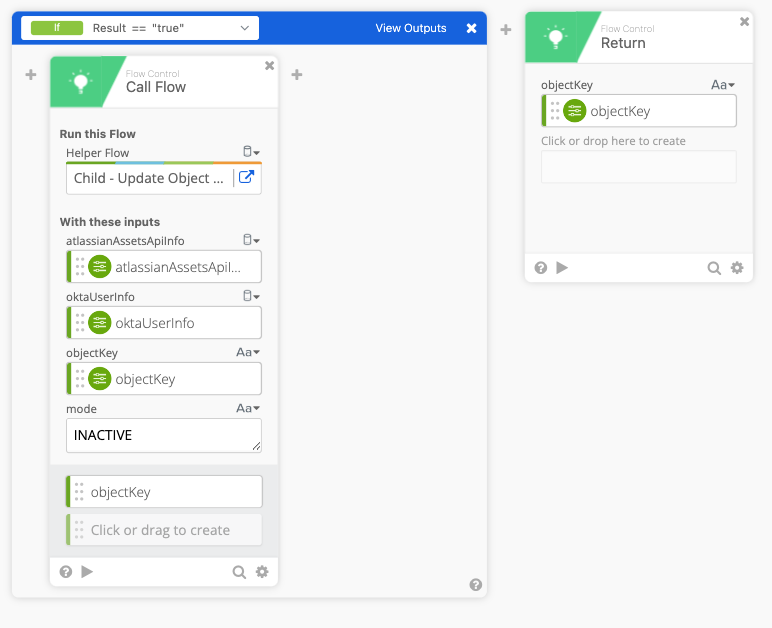
Now we have a set of If/Elseif/Else conditions.
Depending on the value of 'Result' we need to take certain actions.
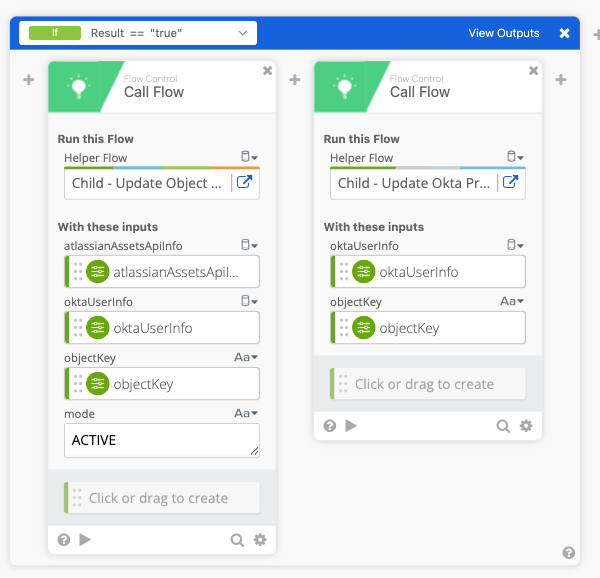
If the boolean Result is 'true' then we have an existing object in Atlassian Assets. So we run a helper flow to update the existing object in Atlassian Assets and mark it as 'active'. Then another helper flow is called which updates the 'objectKey' attribute in the Okta Profile with the value returned from the previous search flow.

If the boolean 'false' is returned for Result then we call a helper flow to create an object. We take the resulting returned 'objectKey' and call another helper flow which updates the 'objectKey' attribute in the Okta Profile with the value.
- Make oktaUserInfo object:
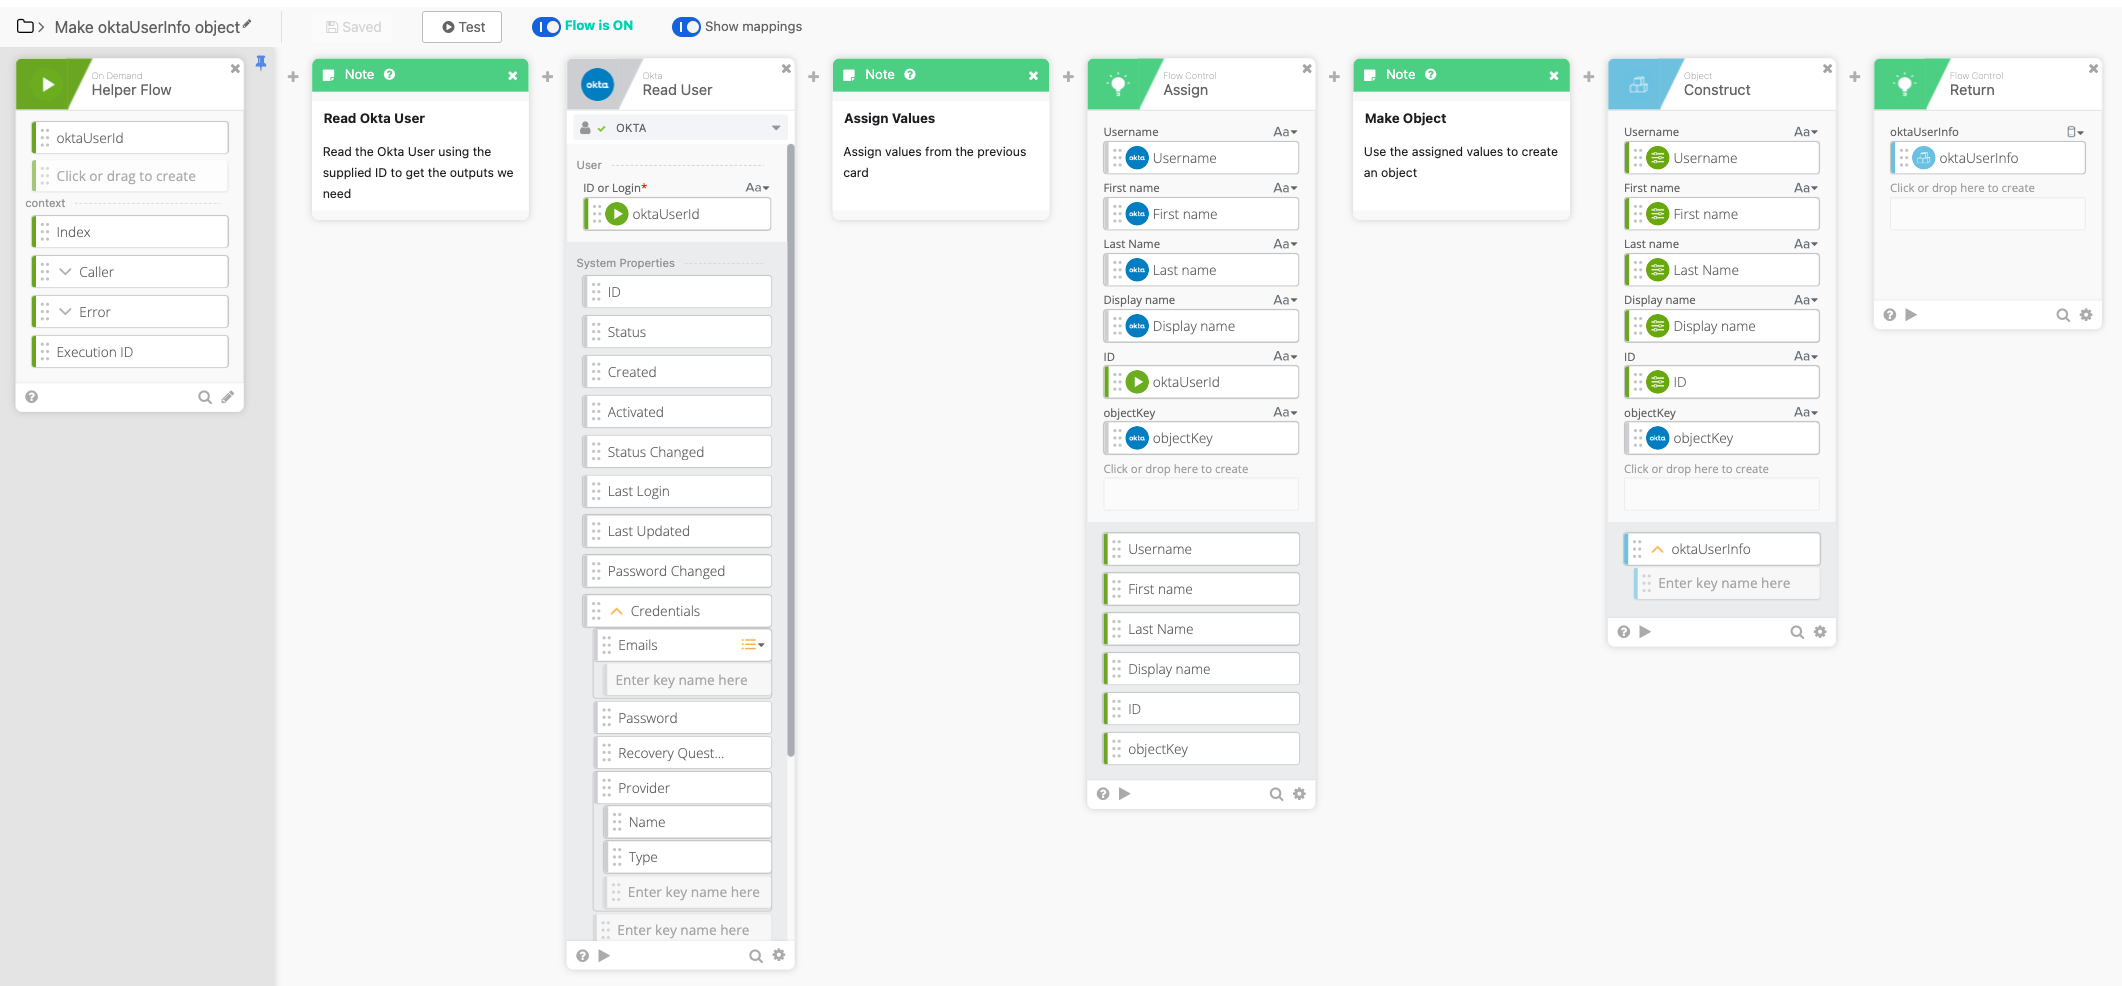
In this flow we simply used the supplied Okta user ID to retrieve information about the user and create an object which is returned.
- Make atlassianAssetsApiInfo object:
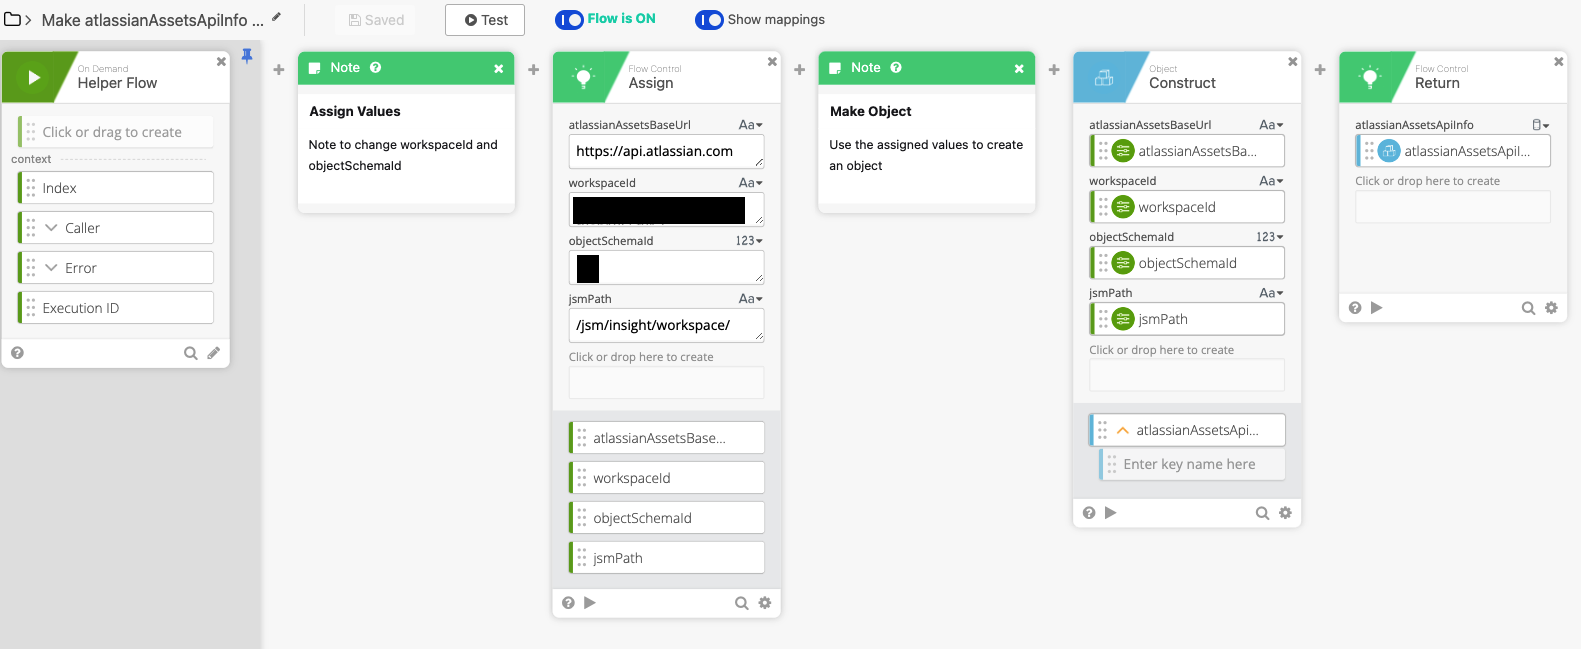
In this flow we simply create an object with information about the Atlassian API and the object is returned. In this flow you need to update 'workspaceId' and 'objectSchemaId' with the values you got from the section 'Atlassian API - Using the API'.
- Child - Search Atlassian Assets People Objects:
This is quite a long flow. So I will explain it in detail.
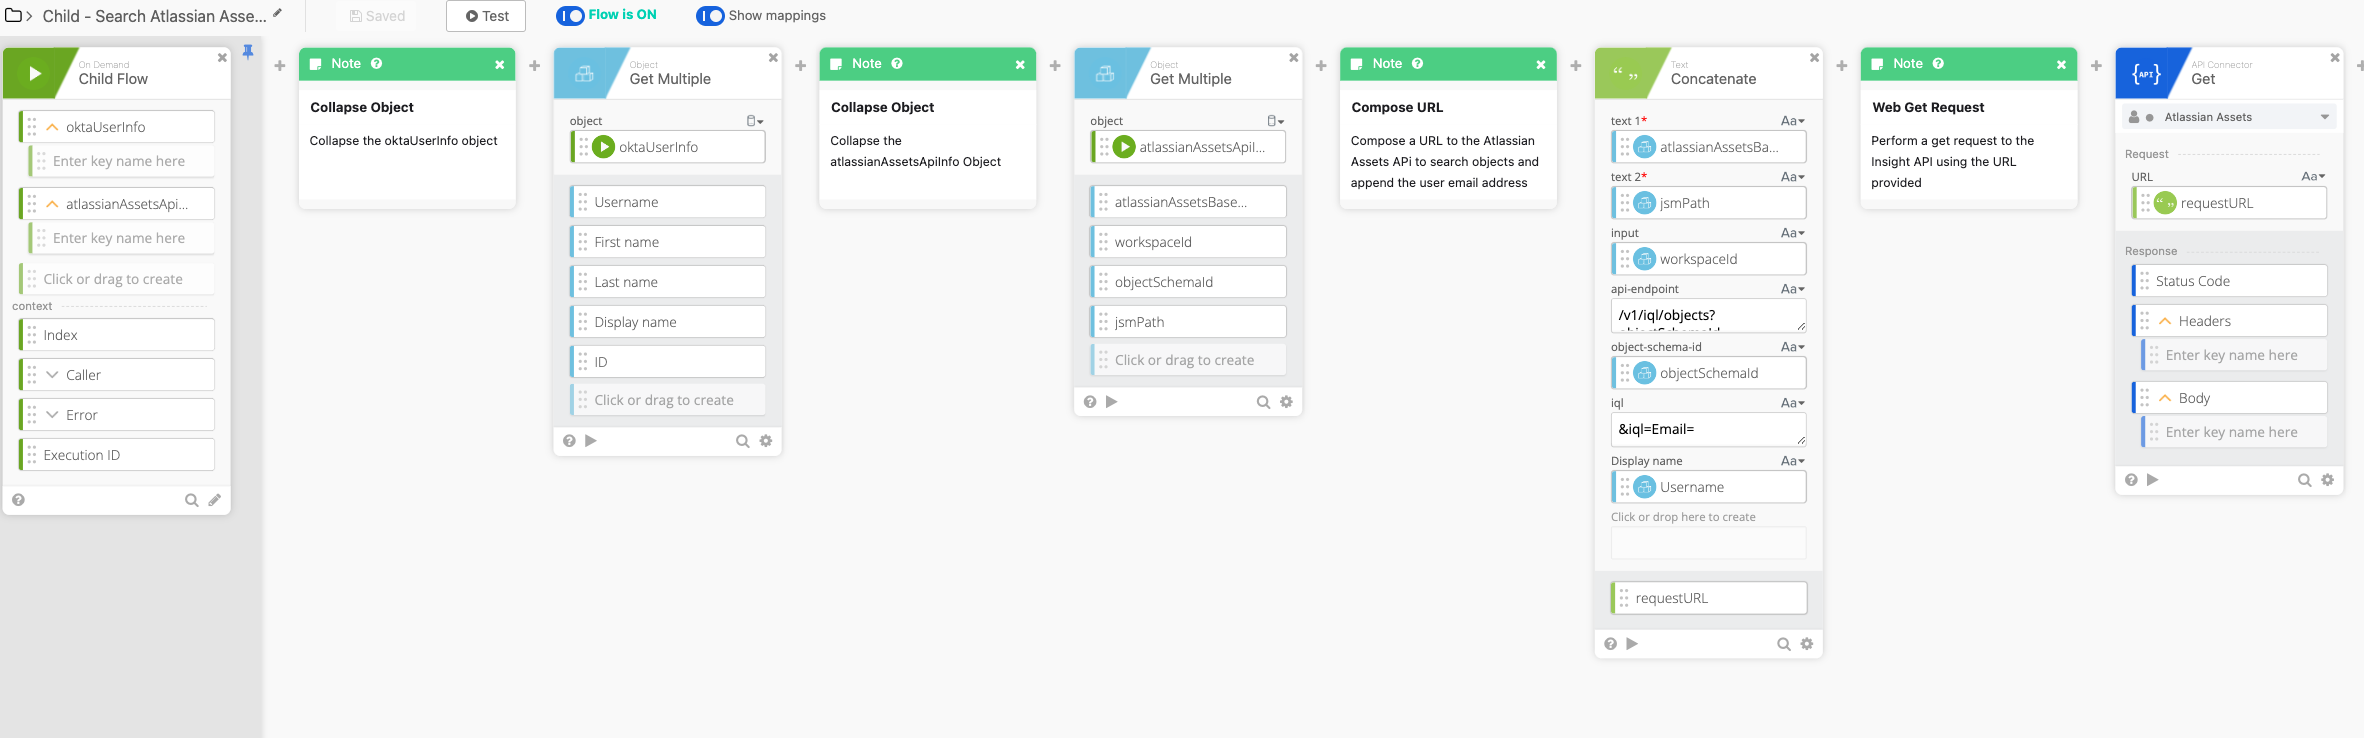
So we first unpack both objects 'oktaUserInfo' & 'atlassianAssetsApiInfo'.
We then use the concatenate card to create a URL which we will use in our API request.
This URL uses the supplied values and also contains the endpoint which is for searching objects in Atlassian Assets based on IQL '/v1/iql/objects?objectSchemaId='. A bit like how an API call to search Atlassian Jira tickets would look like.
Before we can proceed you need to modify the 'API Connector Get' card to use your Atlassian Assets connector you setup earlier in the Atlassian Assets Connector Setup section.
We then perform the Web Request as a GET Request.
We get a body returned with a specific value we need called toIndex.
The value of toIndex is numeric and is the count of objects returned from the search.
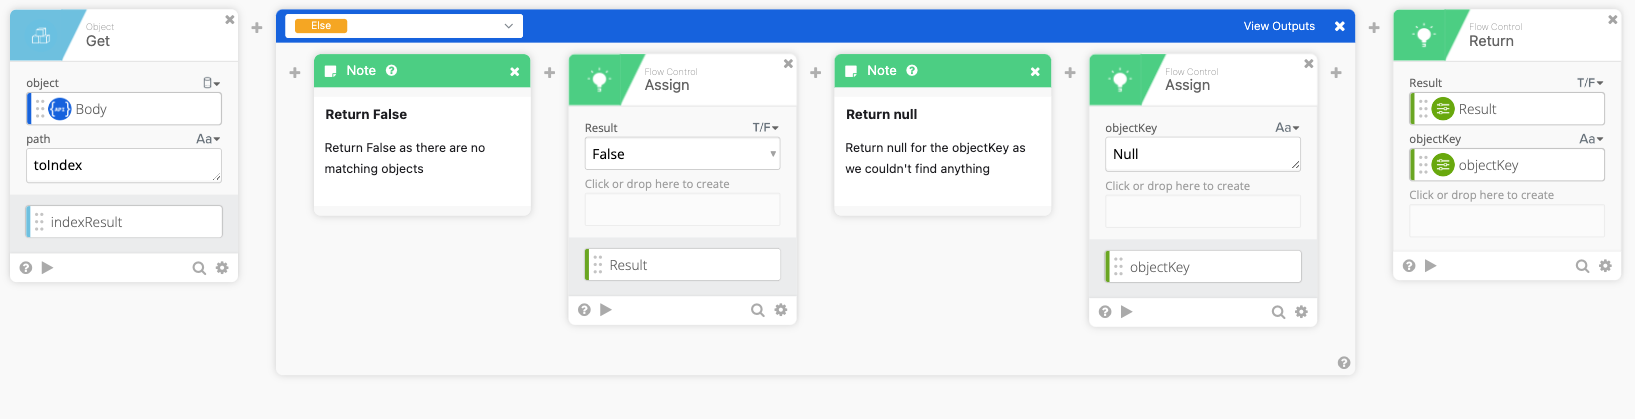
When we have more than 0 results we take the objectKey of the first result and return it along with the boolean 'true'.
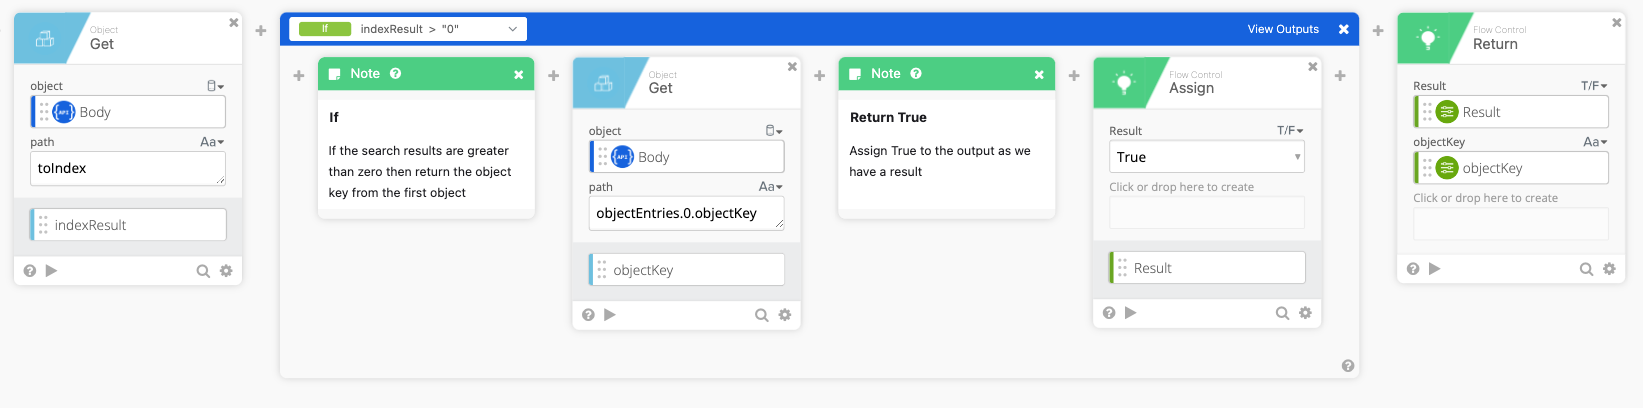
When we have 0 results we set objectKey to 'null' and return it along with the boolean 'false'.
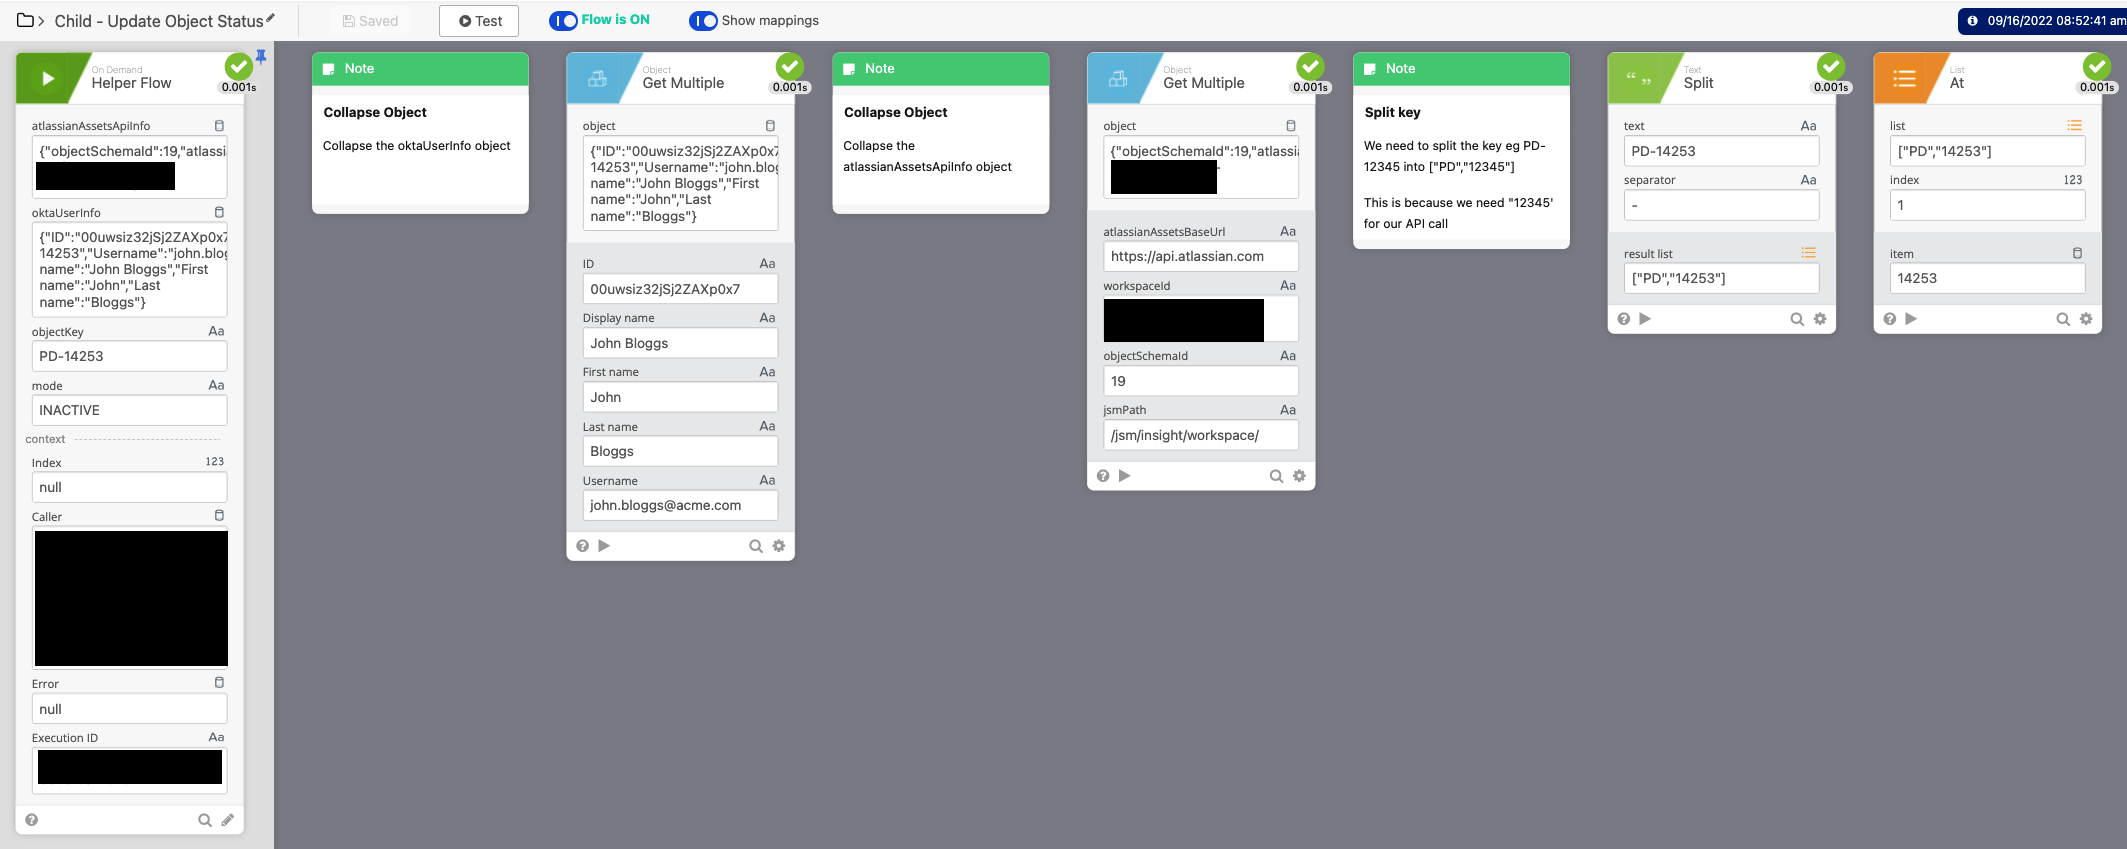
- Child - Update Object Status:
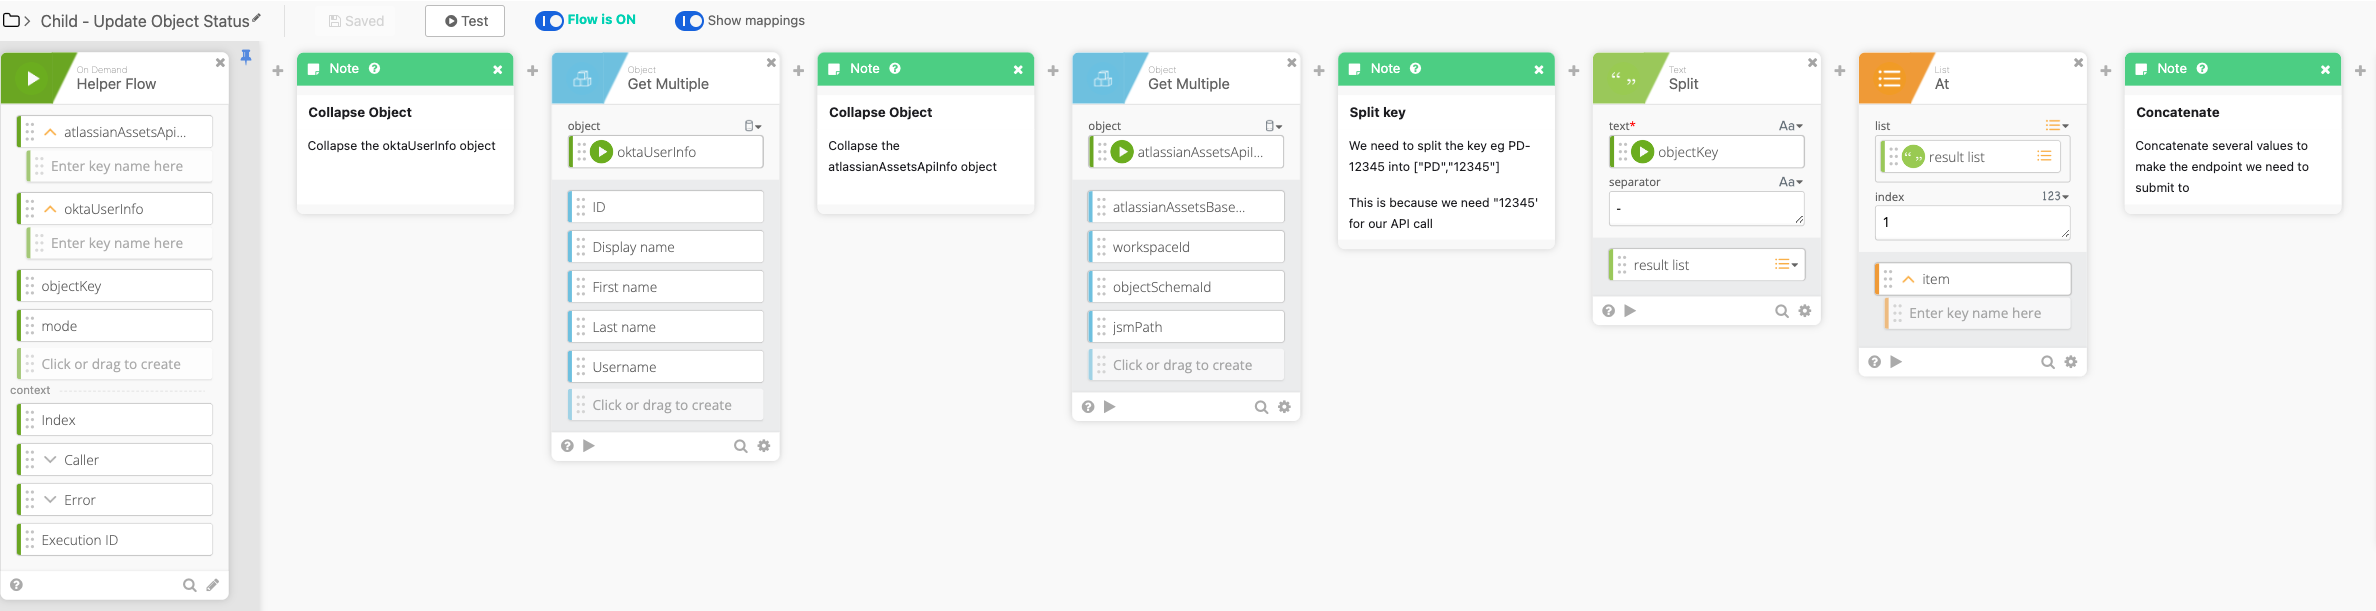
In the first cards of the flow we unpack both objects 'oktaUserInfo' & 'atlassianAssetsApiInfo'.
Then we take 'objectKey' from the input and remove the prefix, eg PD-12345 beccomes 12345.
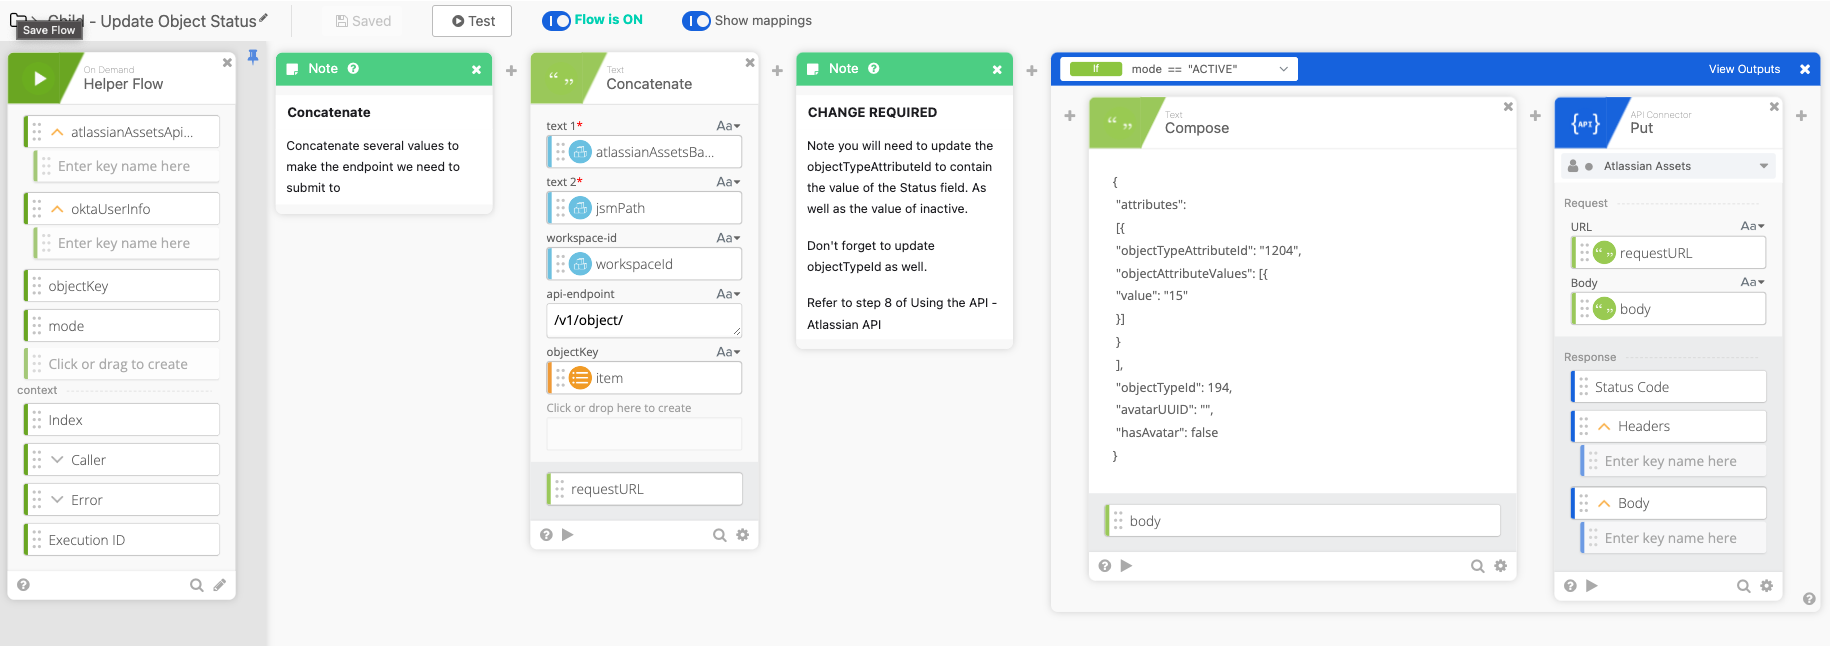
Then we use a concatenate card to make a URL for the object we are modifying. If the flow input variable 'mode' is 'ACTIVE' then we set the object status attribute as 'ACTIVE' using the value of 15 for our attribute. Note: You will need to modify the 'API Connector Put' card to use your Atlassian Assets connector you setup earlier in the Atlassian Assets Connector Setup section.
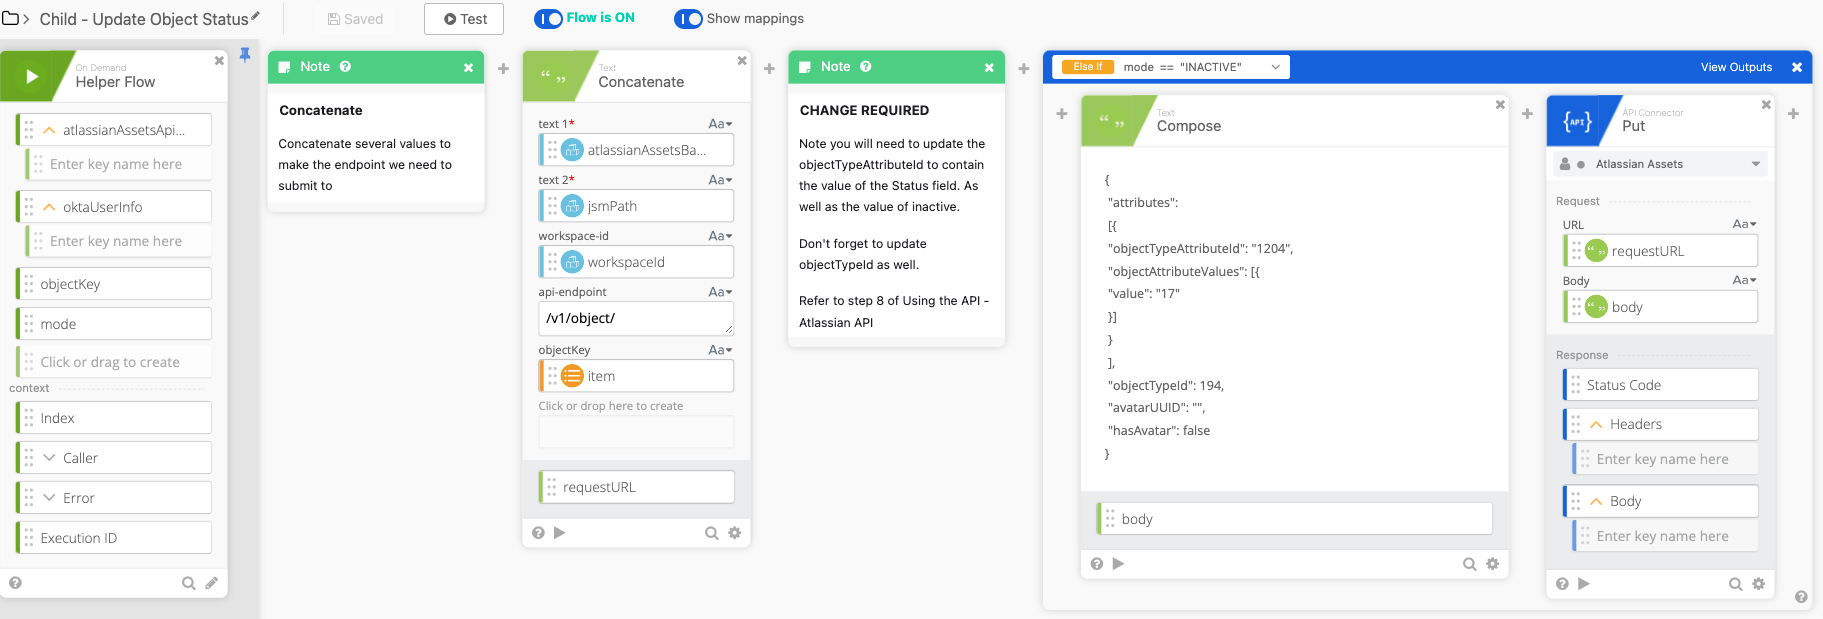
Else if the flow input variable 'mode' is 'INACTIVE' we set the object status attribute as 'INACTIVE' using the value of 17 for our attribute. Refer to the section 'Atlassian API - Using the API' for where to find these integers. Note: You will need to modify the 'API Connector Put' card to use your Atlassian Assets connector you setup earlier in the Atlassian Assets Connector Setup section.
-
Child - Update Okta Profile:
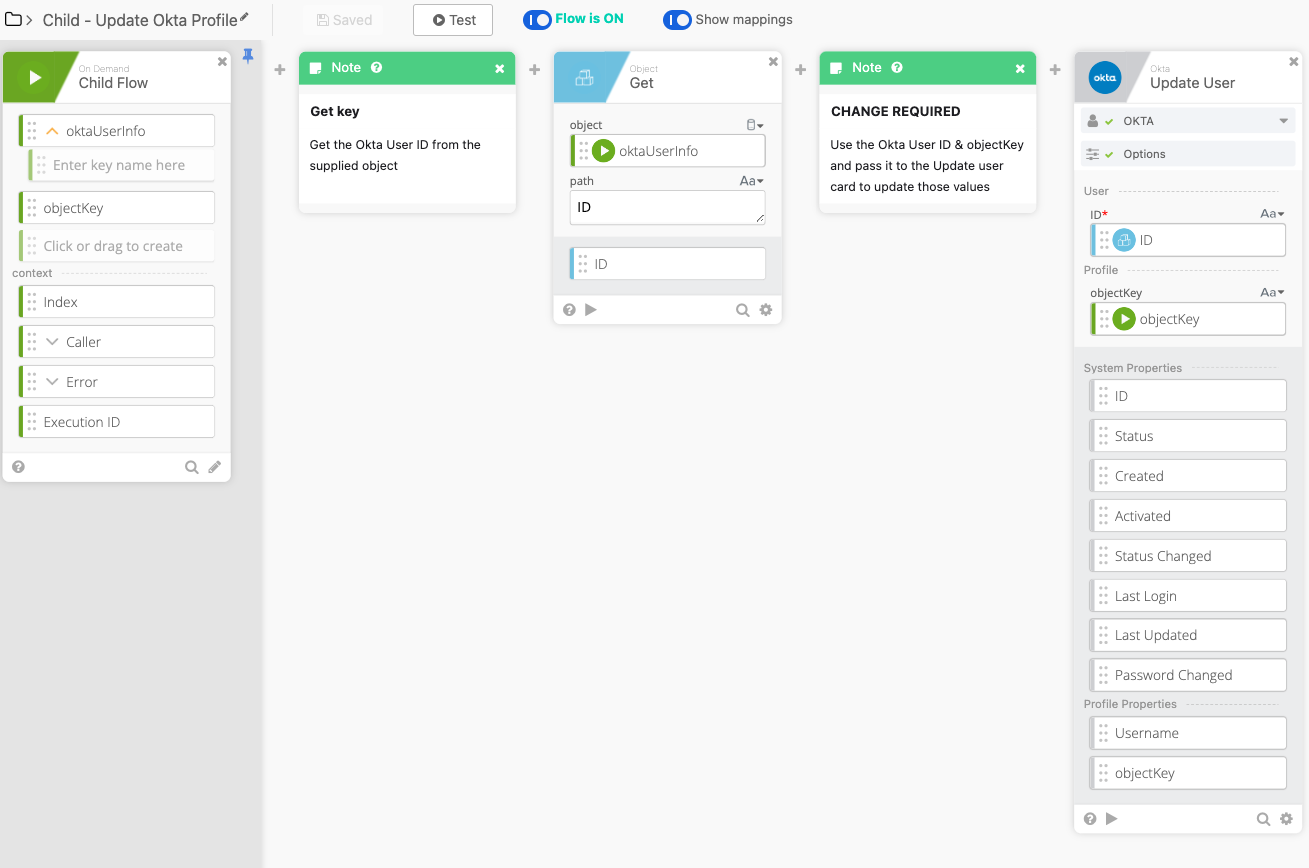
In this flow we simply use the Okta user ID and the input of 'objectKey' to update the Okta profile attribute 'objectKey'.
-
Child - Create Object:
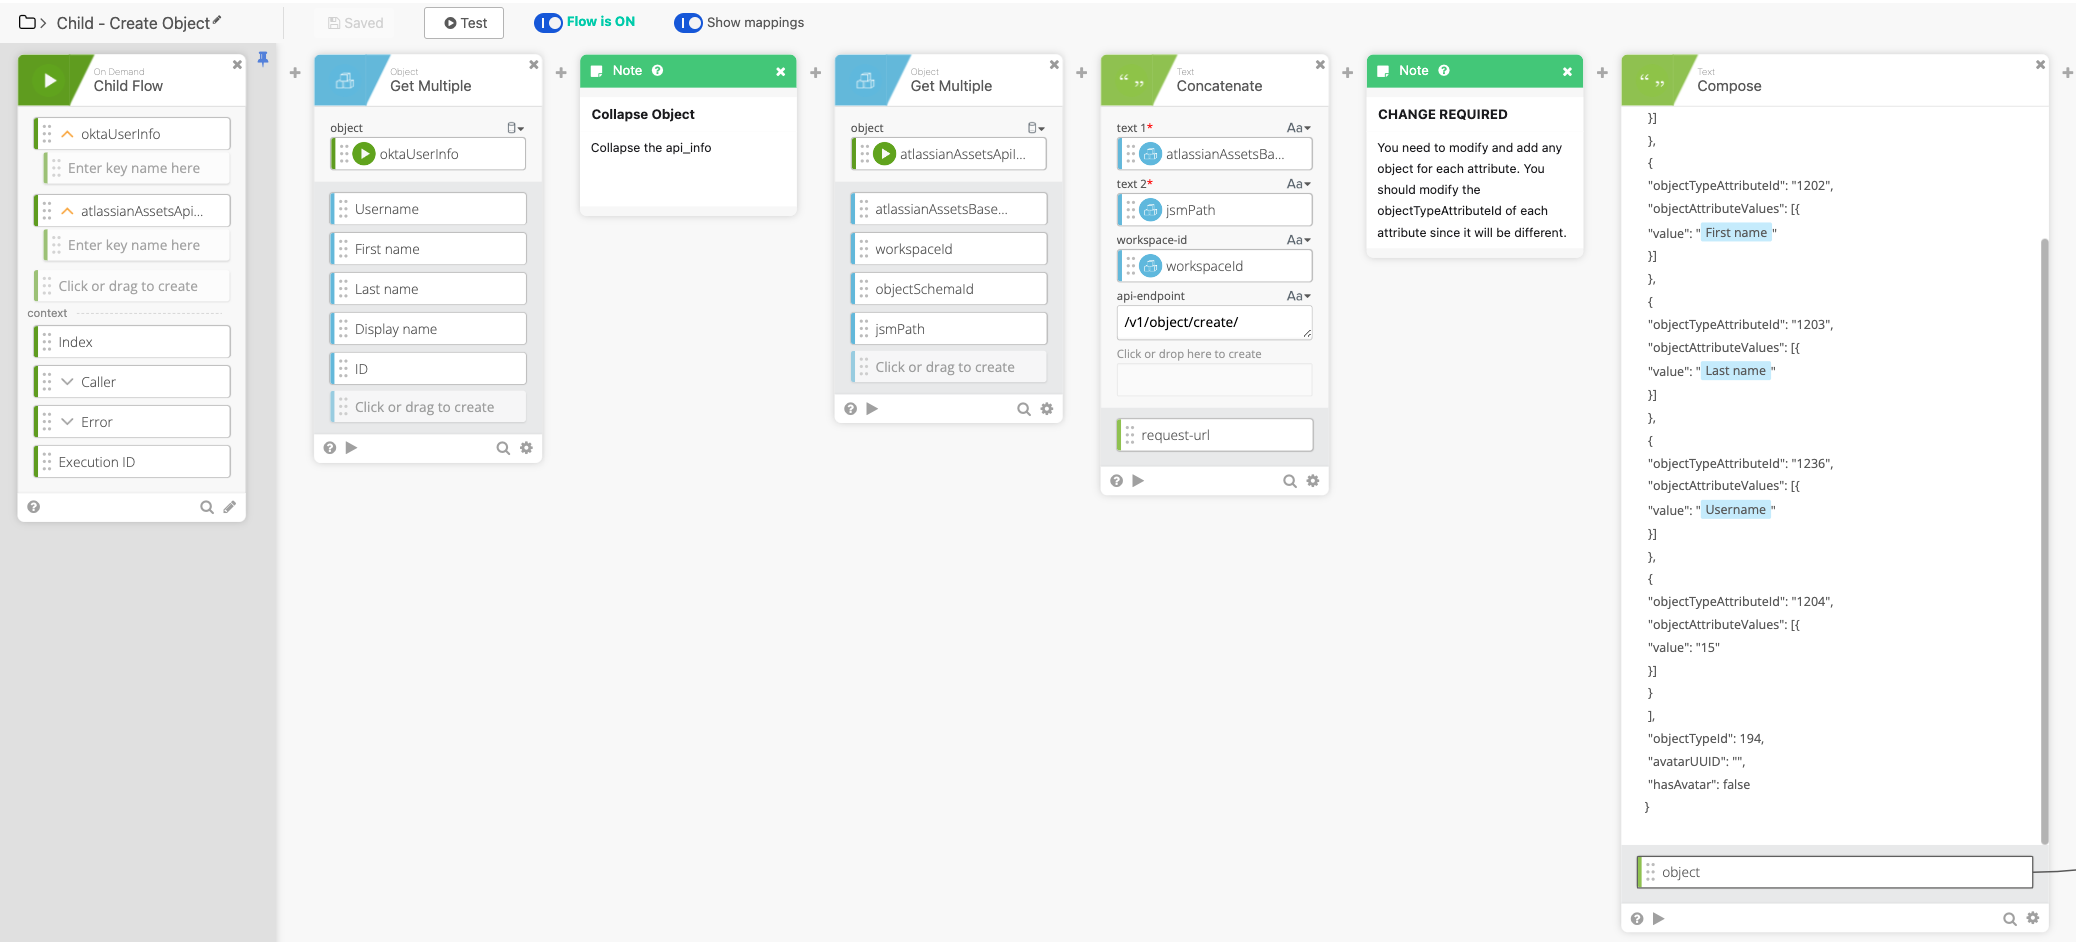
In this flow we create an object using the 'oktaUserInfo' object and a JSON template in the compose card. You do need to modify the contents of the compose card depending on your attributes. So you would add a list of objects for each attribute as well as the ID and value. Think about how you can expand on the People schema to include working location, department, manager & etc.
We also setup the URL to create an object using the concatenate card.
We then perform a POST to that URL to create the object and return the 'objectKey' value from the response body.
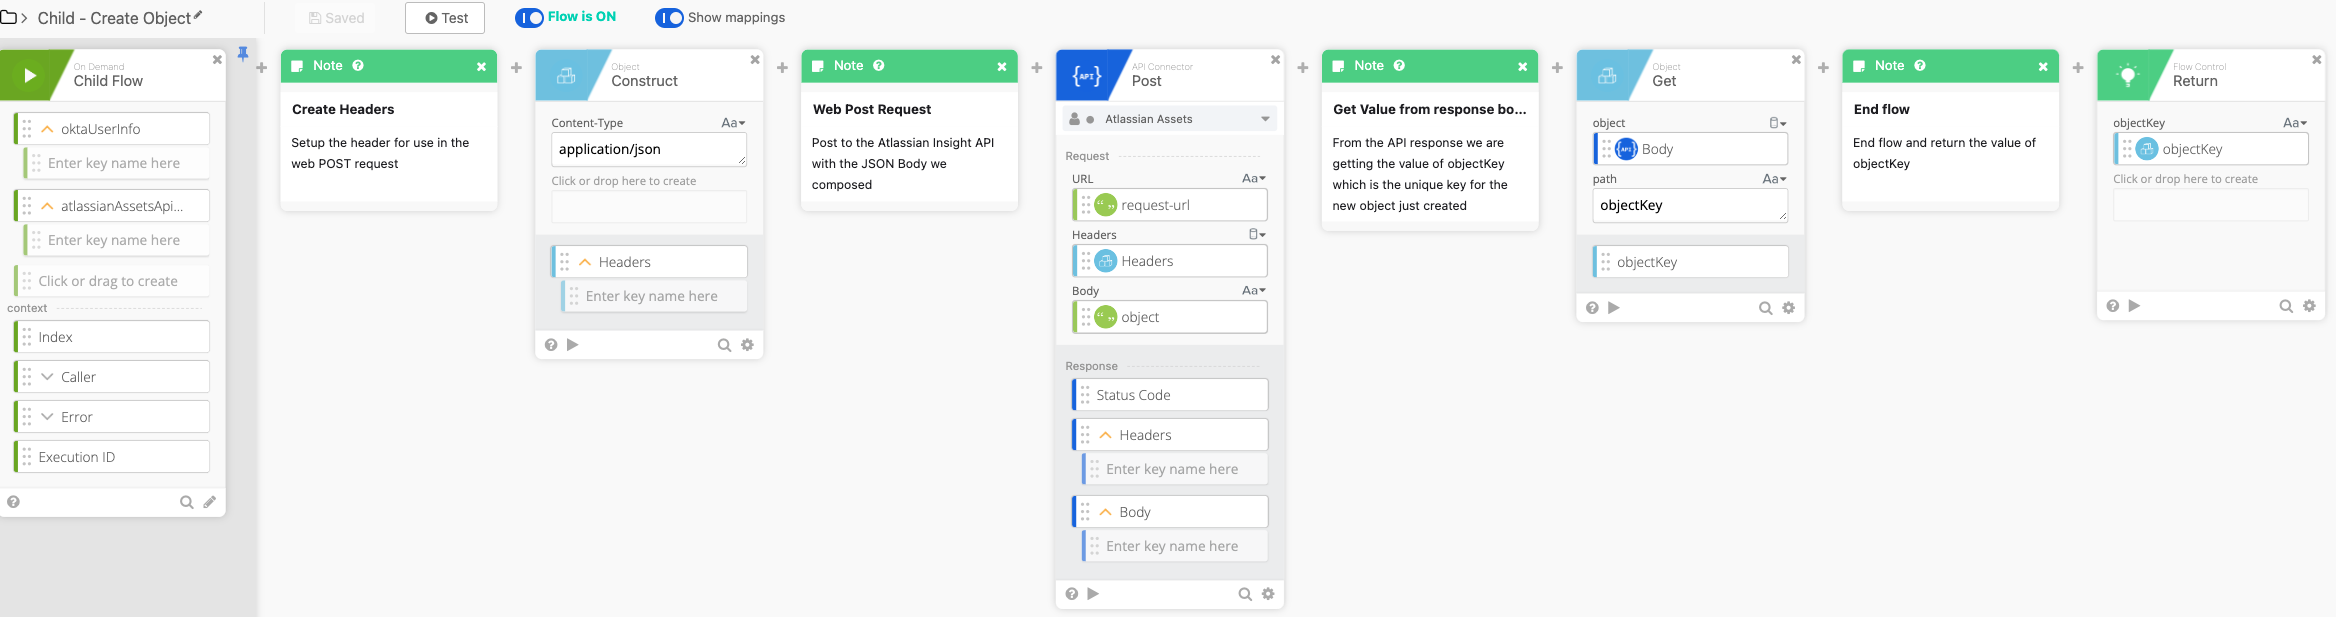
You will need to change the connector on this card to the connector you made at the section Atlassian Assets Connector Setup.
-
Parent - Okta User Deactivated:
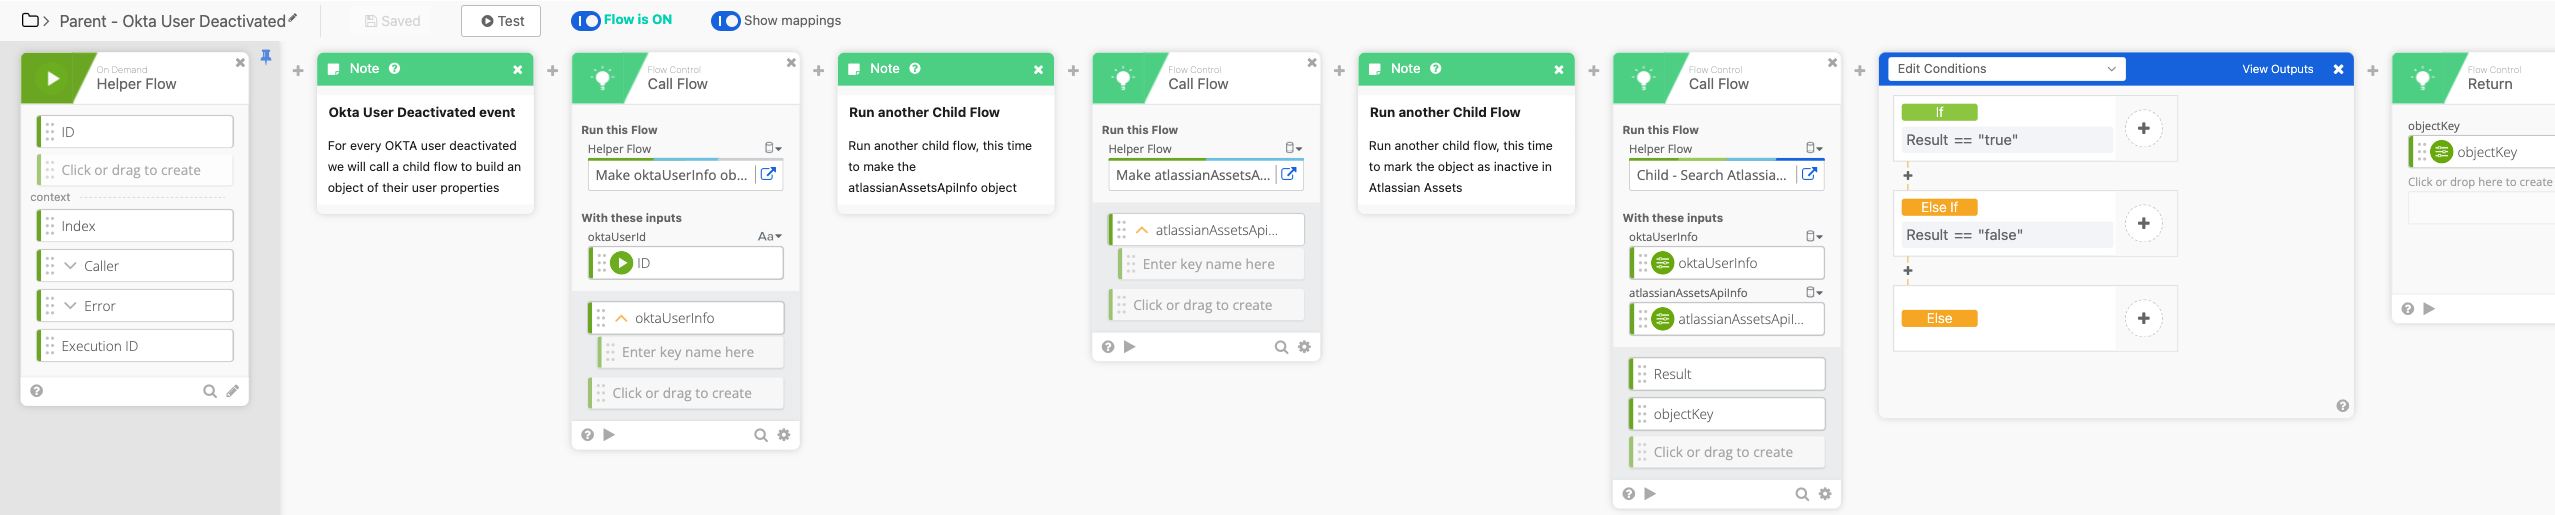
This is basically the same as the Parent - Okta User Created flow, so you'll want a workflow with the Okta user deactivated event and then a 'Call Flow async' card to call this flow.
The important bits are in the If/ElseIf card.
If the 'Result' value is equal to 'true' then we call a helper flow to update the object. We use the mode 'inactive'.

Whereas if the 'Result' value is equal to 'false' then we call a helper flow to create an object. We then update the object status and we use the mode 'inactive'.
-
Parent - Okta User Updated
As mentioned previously it's a good idea to have a single workflow for Okta Event actions, so in this case you'll need a workflow with the Okta user profile updated event and then a 'Call Flow async' card to call this flow. The reason for including an update user flow is that when someone has a name change we would like to update the People object in Atlassian Assets.
-
Child - Update Object
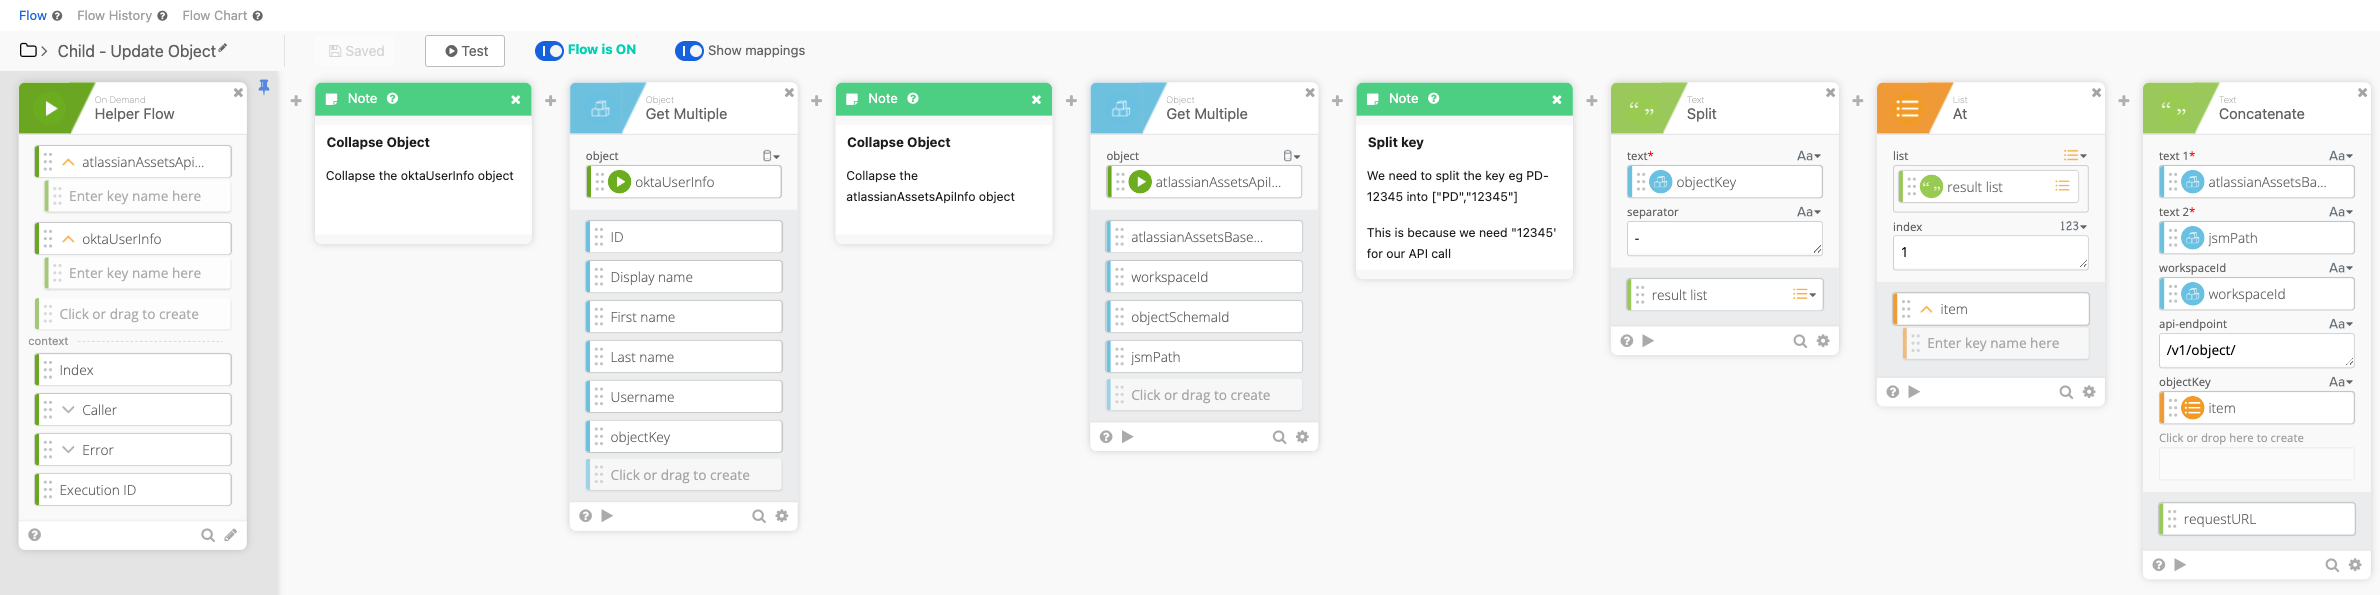
This flow starts off the same as the 'Child - Update Okta Profile' flow but includes an extra key 'objectKey' which is taken from the 'oktaUserInfo' object.

There is a compose card used to generate the JSON for the attributes which require updating, I found omitting attributes which already have values set results in a 404 error. Hence why I am using the same base JSON as from the 'Child - Create Object' flow. Only difference is here I make the assumption that every Okta user who has a profile update is going to be active. Hence my reason for including that attribute.
Workflows Demonstration and tests
So now I am going to show the workflow in action with some real life tests,
due to the length of this blog I'm not going to show everything.
Creating an object in Atlassian Assets when a new Okta user is created
In this example we are going to create a fresh Okta User, simulate the workflow and expect to see a People Object created in our 'People Demonstration Schema'. The 'objectKey' will be updated on the Okta User Profile.
-
So here I am going to create an Okta user called Joe Bloggs, as you can see our Atlassian Assets Schema contains no objects.
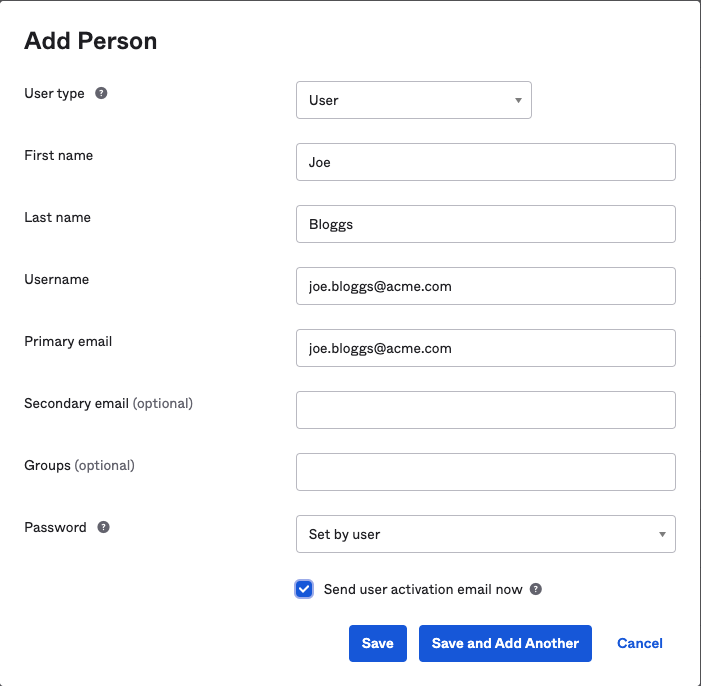

-
We also should make sure we set the Display Name attribute for the Okta user
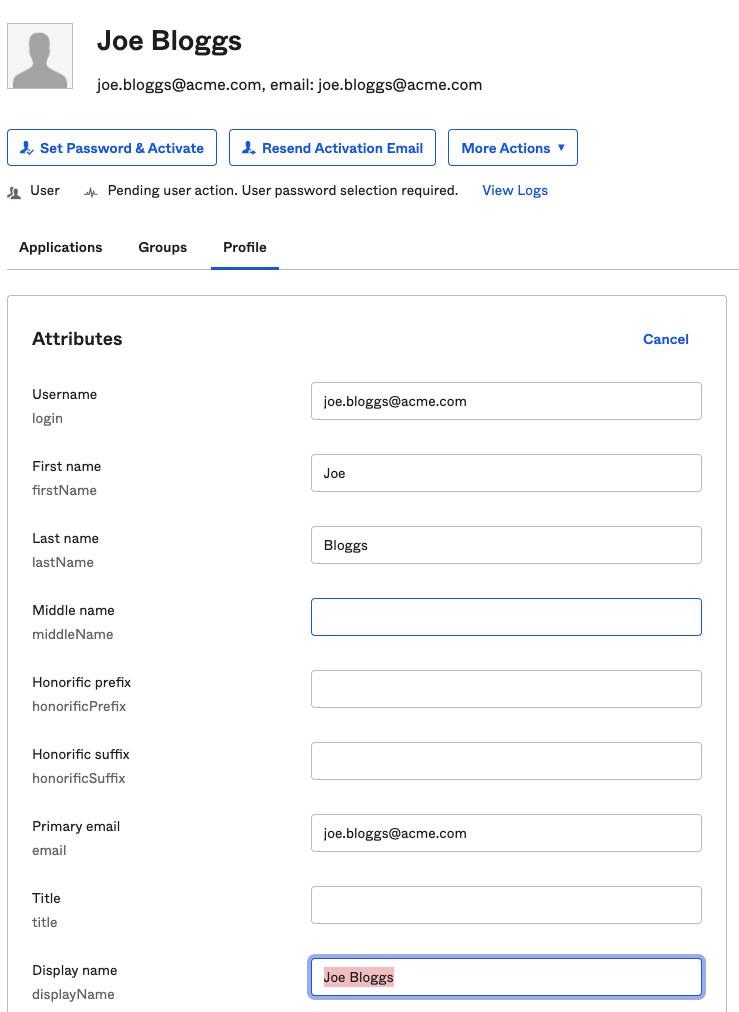
-
To simulate the Okta event of when a new user is created I am going to take the ID of the Joe Bloggs user and then use it to test the 'Parent - Okta User Created' workflow
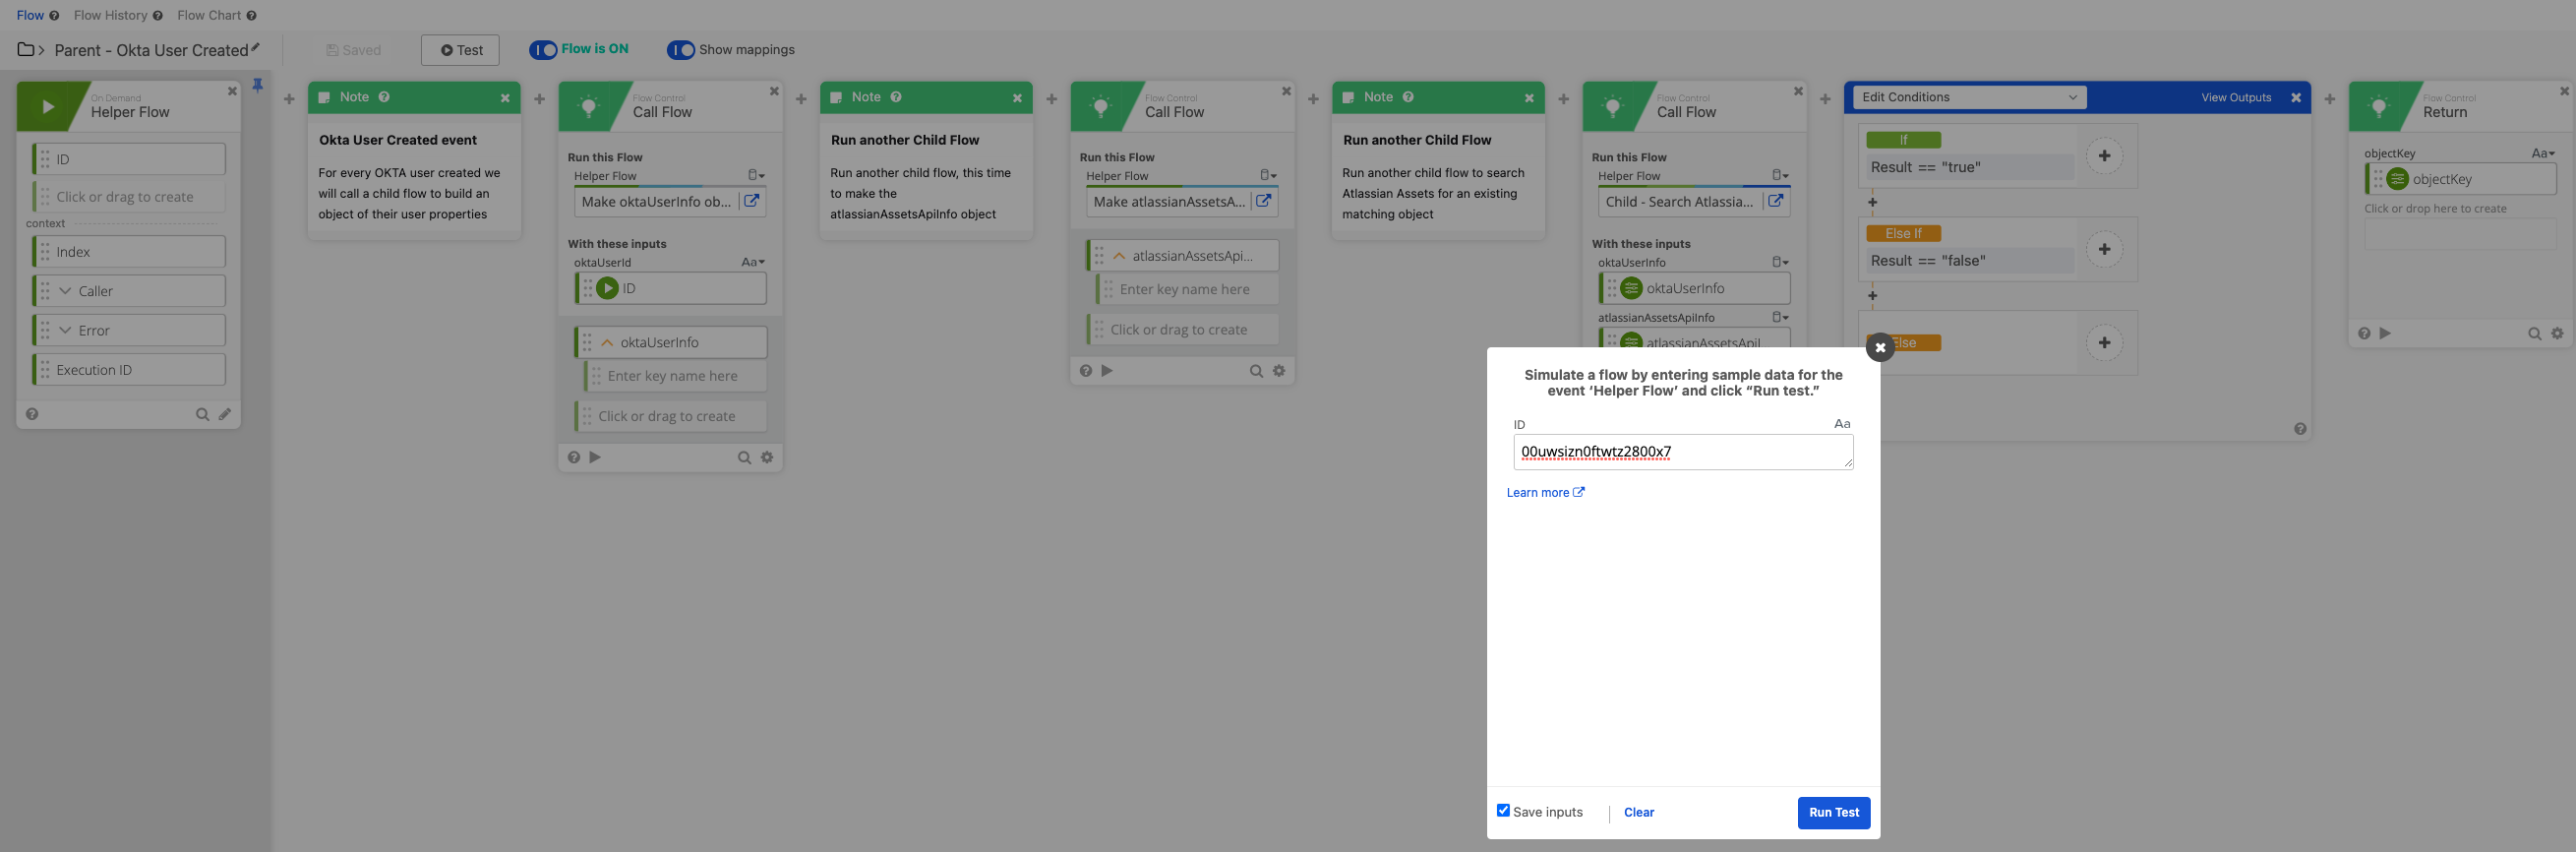
-
Let's have a look at what went on

To begin we inputted the Okta user ID. Then the 'Make oktaUserInfo object' flow was called and returned an object with information about the user. Then the 'Make atlassianAssetsApiInfo object' flow was called and returned an object with information such as the Workspace ID. Now the fun part, we called the 'Child - Search Atlassian Assets People Objects' flow and inputted the 2 Objects we had just returned. This search flow returned 'false' for the result and 'null' for the objectKey.
Now we can look at our paths in our If / Elseif statement. Because 'result' had the value of 'false' we called 2 flows. Firstly calling 'Child - Create Object' and supplying the 2 previous objects as inputs. This flow then returns the objectKey.
Let's look at the execution of that flow
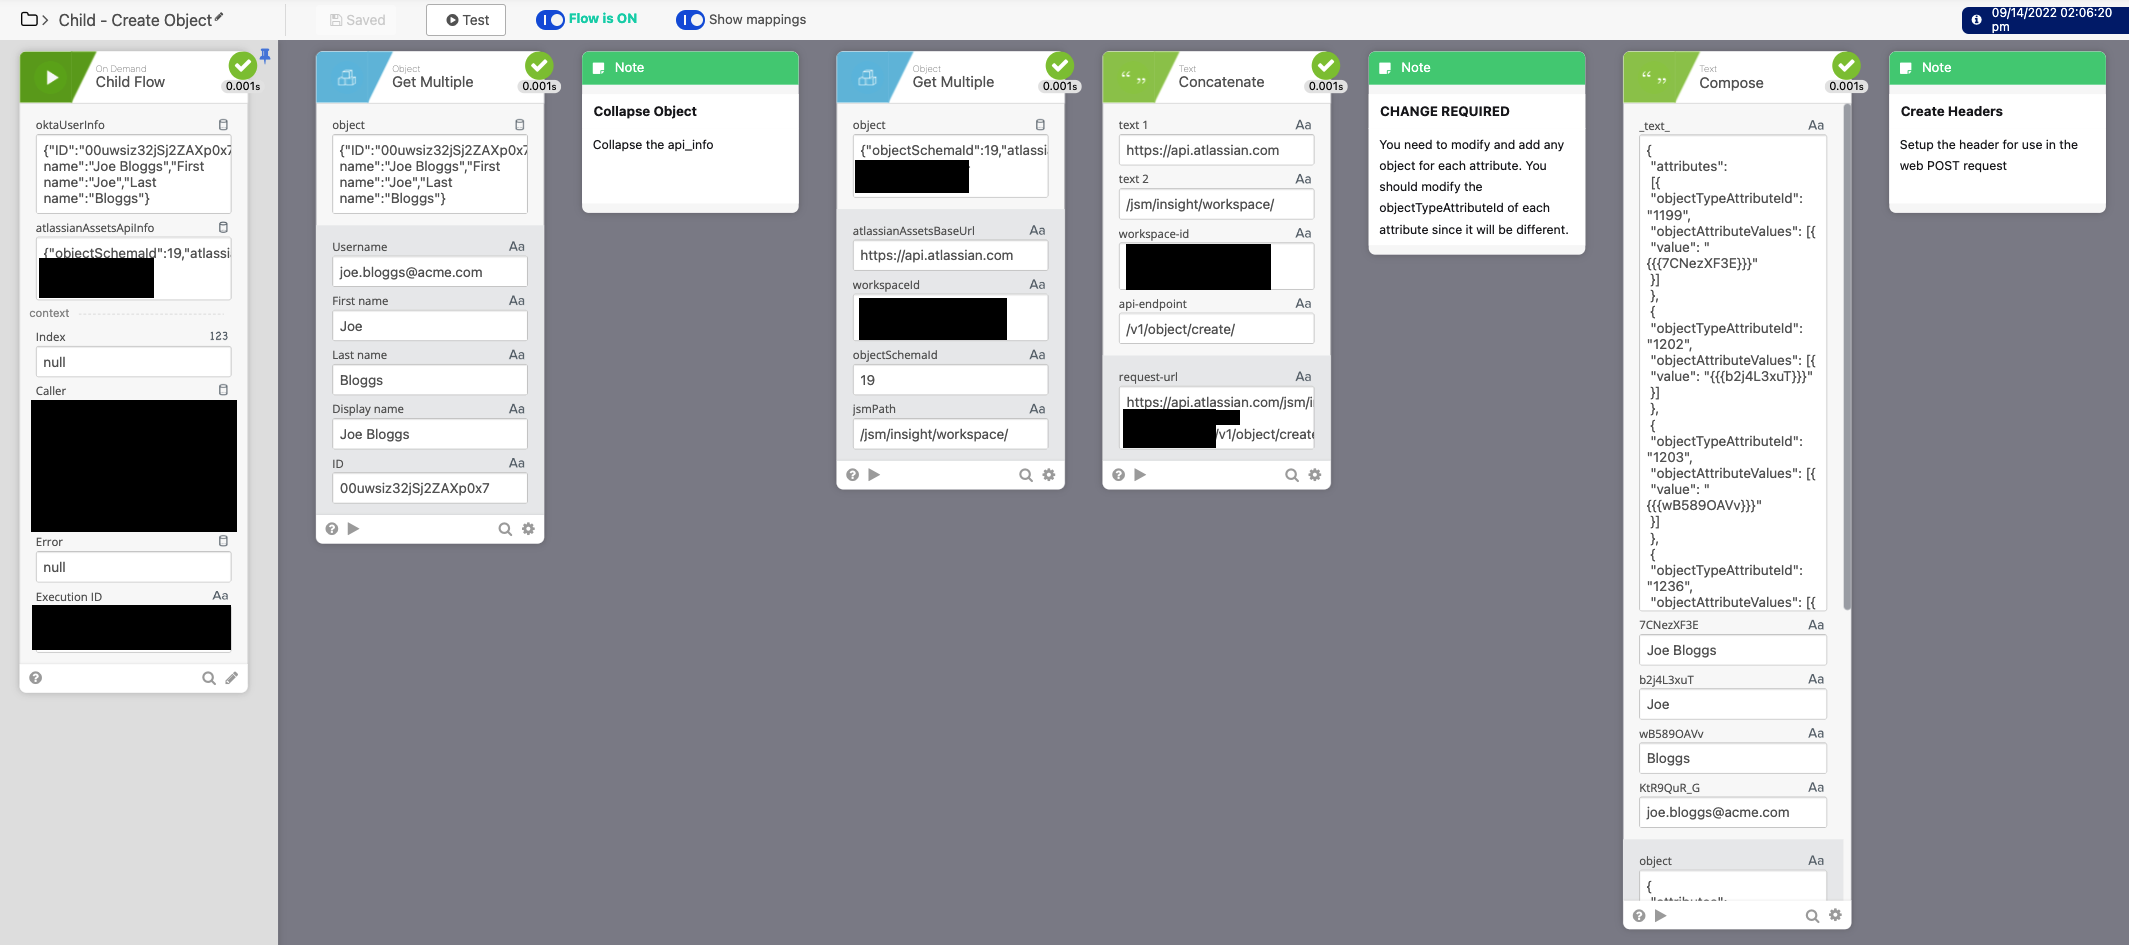
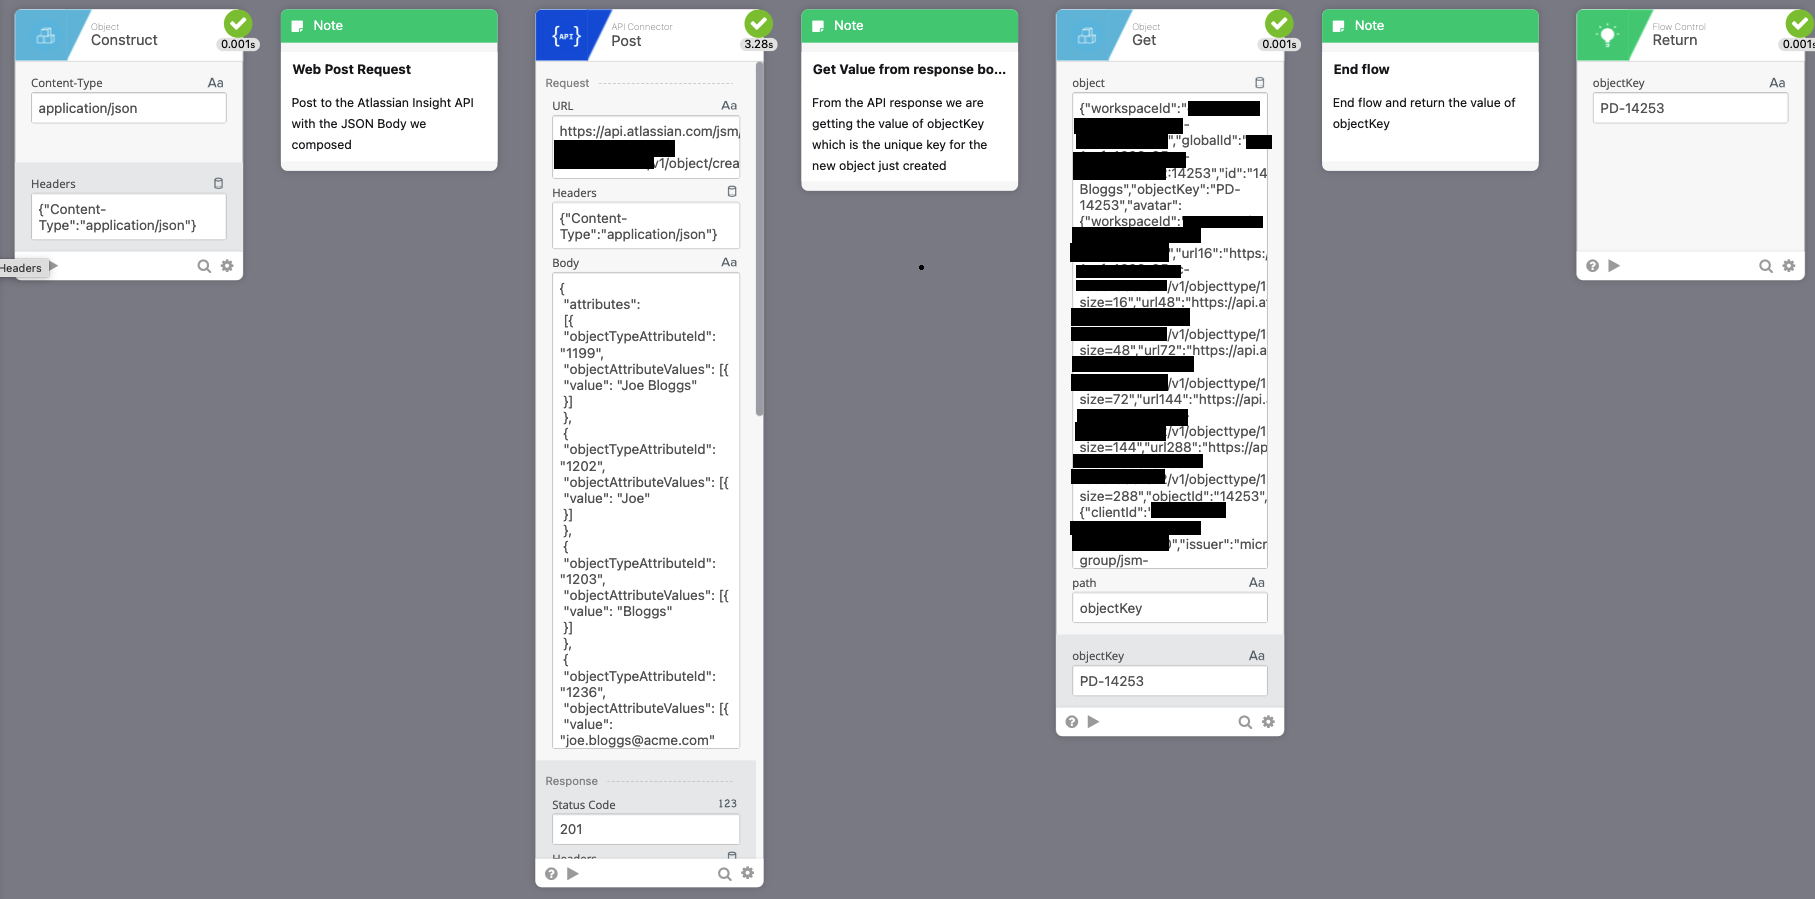
You can see we unpacked both objects that were inputted to the flow, then we constructed a URL to use for creating an object. We setup our request body using a compose card (I know I'm sorry) and we set our content-type header to application/json. Finally we do our POST request to the URL we previously constructed and attach our request body. We then grab the objectKey from the response body of the API call. This objectKey is then returned.
Let's have a look at what went on in flow for updating the Okta User Profile objectKey attribute.
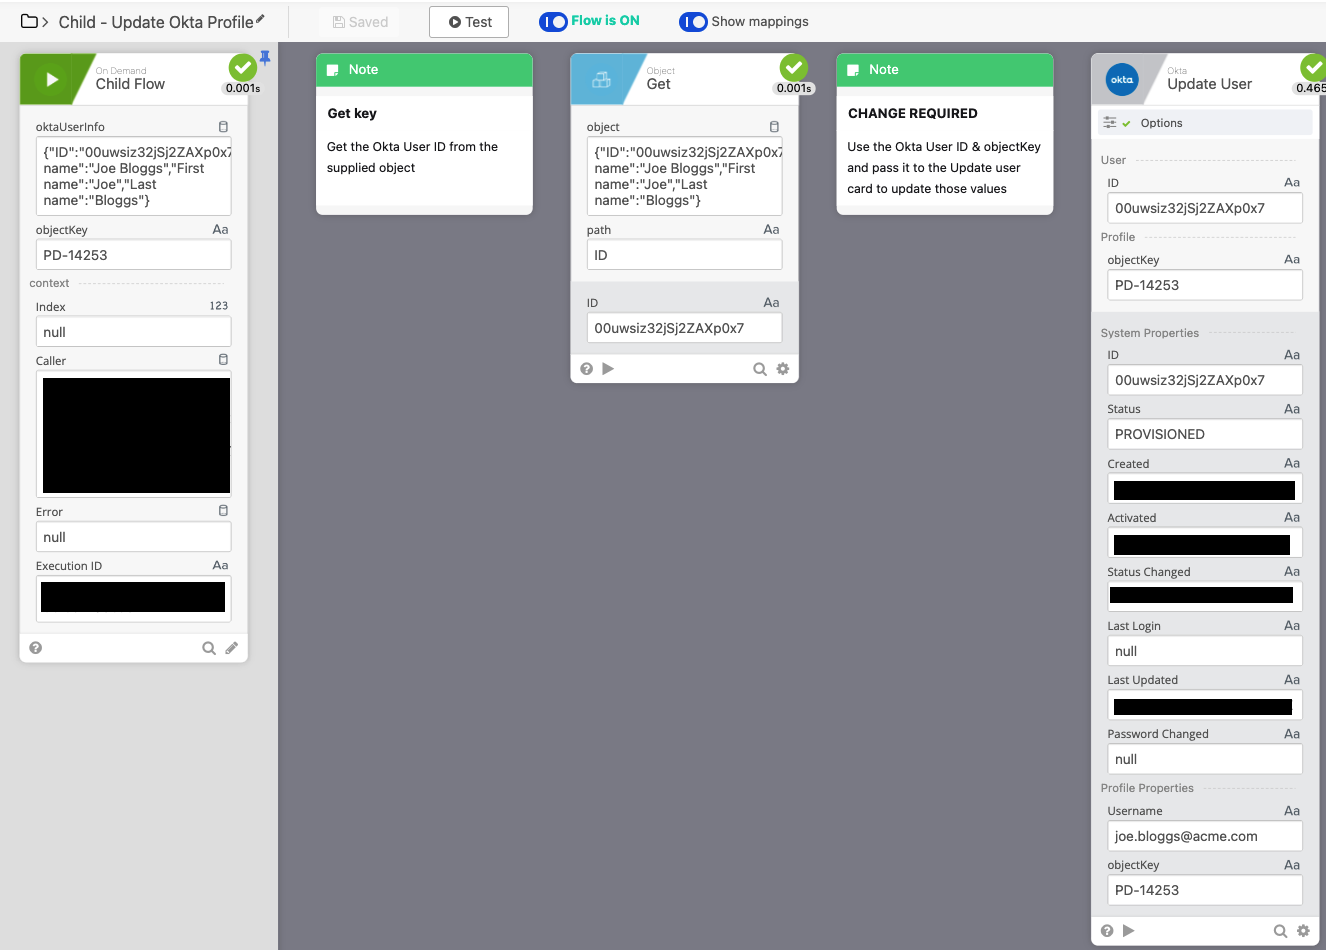
It's pretty simple, input the Okta User ID and the value of the attribute you want to update.
The end result
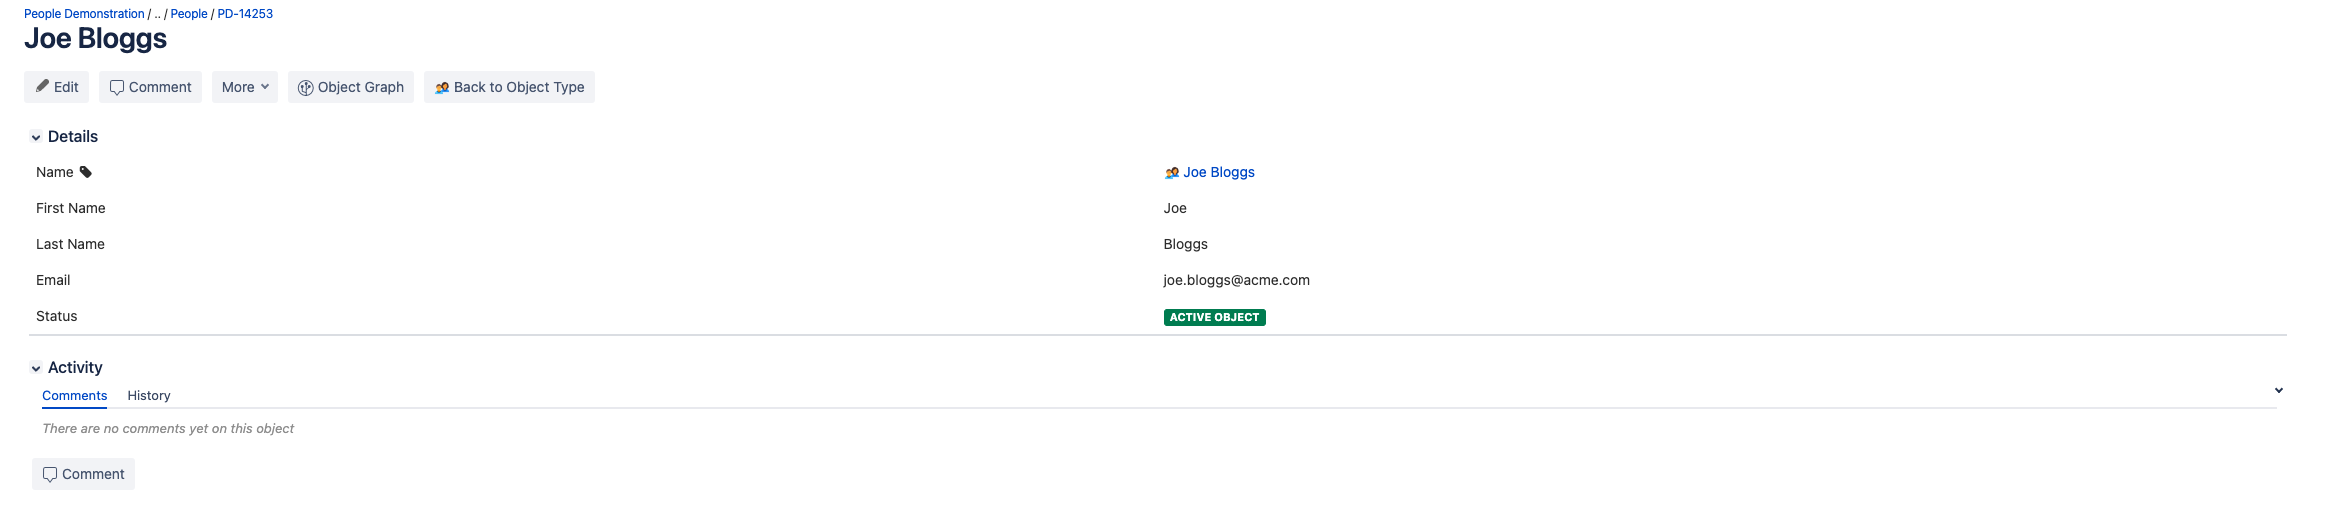
An object in our People Demonstration schema.
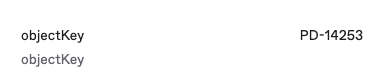
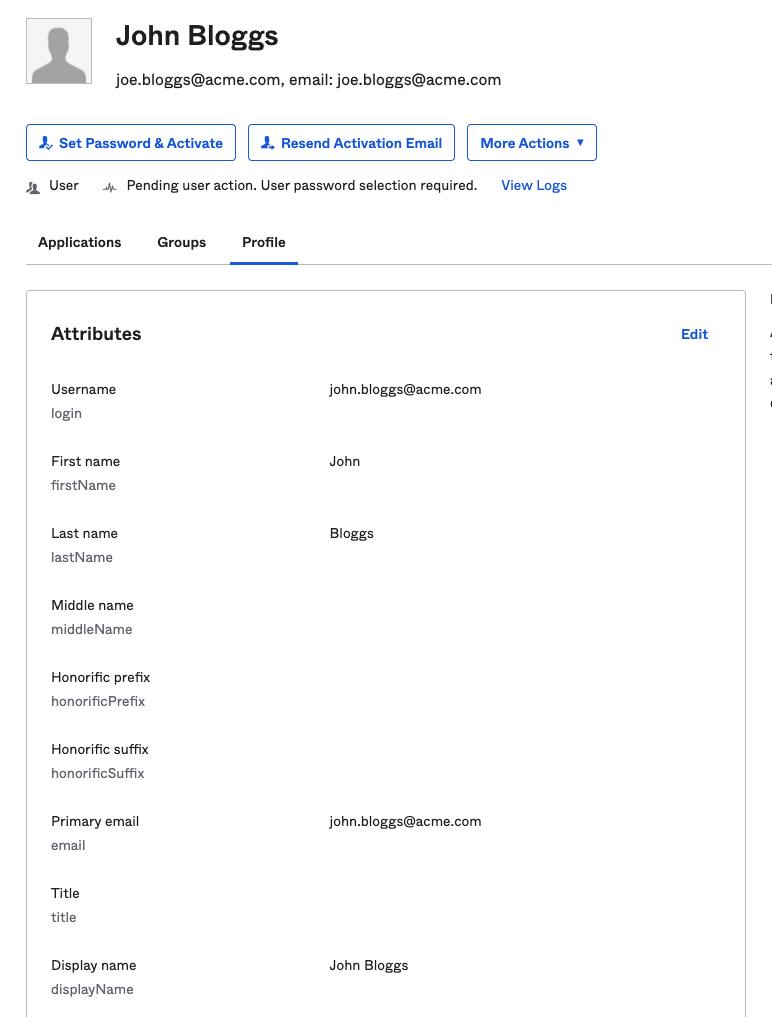
You can see the 'objectKey' attribute updated in the Okta User Profile
Updating an existing object in Atlassian Assets when an Okta user profile is updated
In this example we are going to update the Okta User Joe Bloggs and change the
first name to John, we will also be updating the Okta User username and Email as well.
What should happen when we test the Workflow is that the objectKey with the value
currently in the Okta User Profile will be updated with these new details as well.
-
Here we are updating the Okta User Profile details
-
Here we are triggering the Okta Workflow 'Parent - Okta User Profile Updated' with the provided Okta User ID
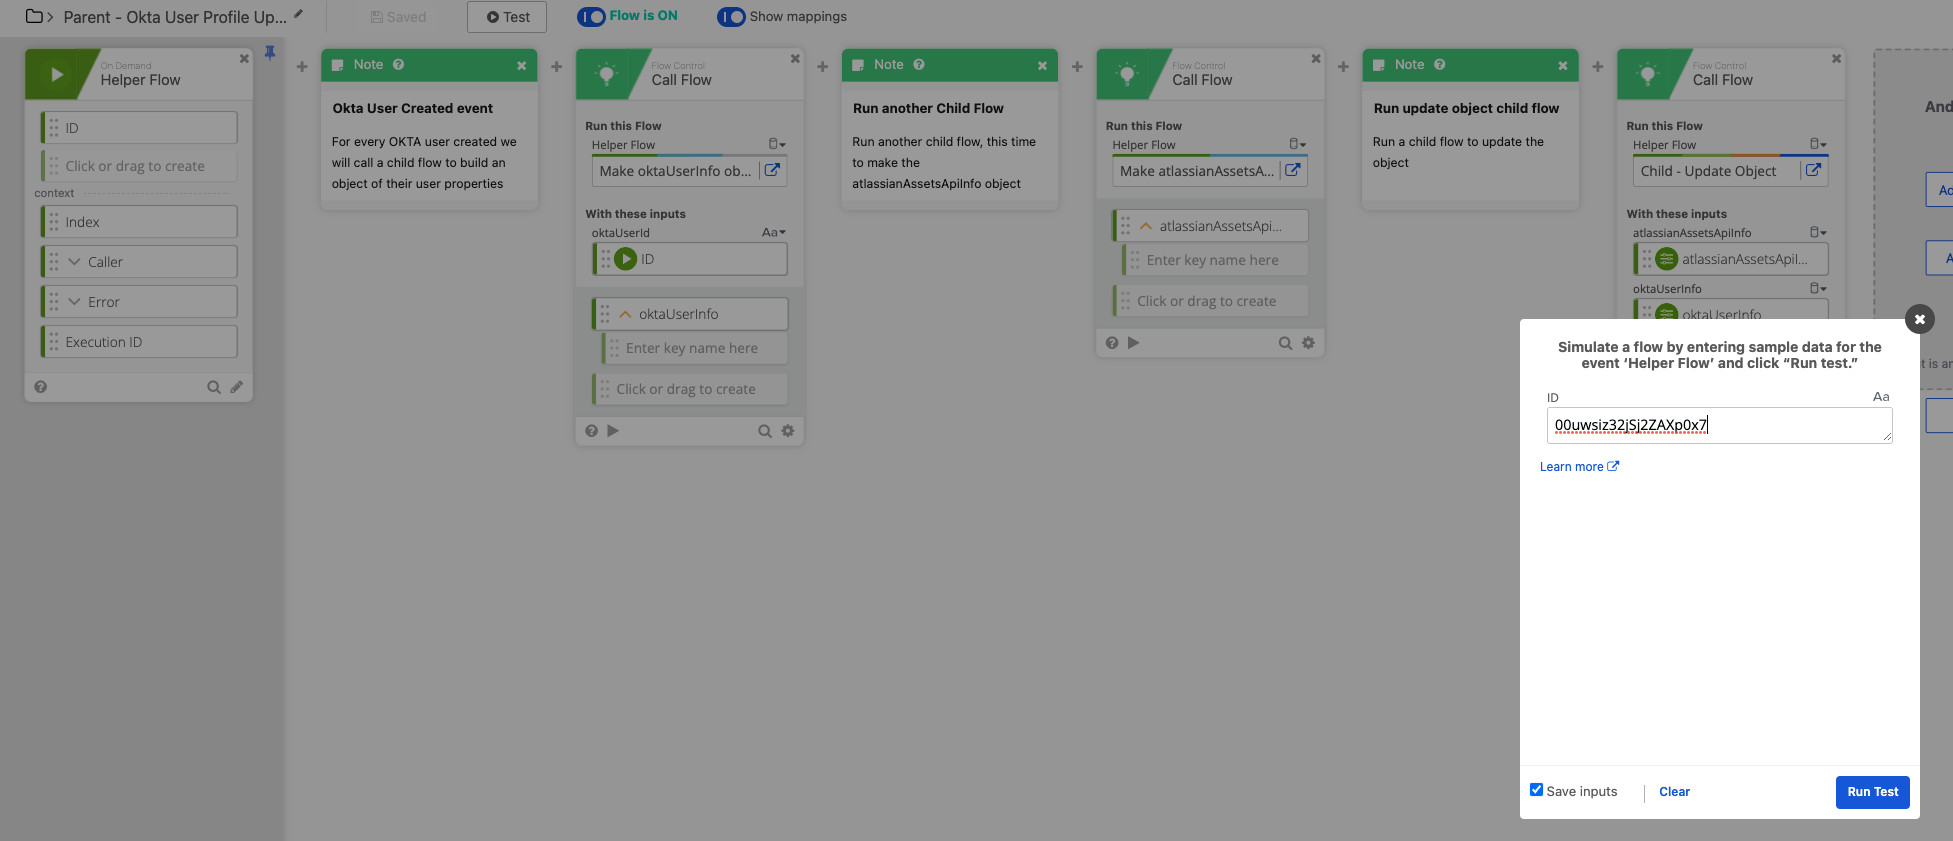
-
Let's go over what happened in this flow.
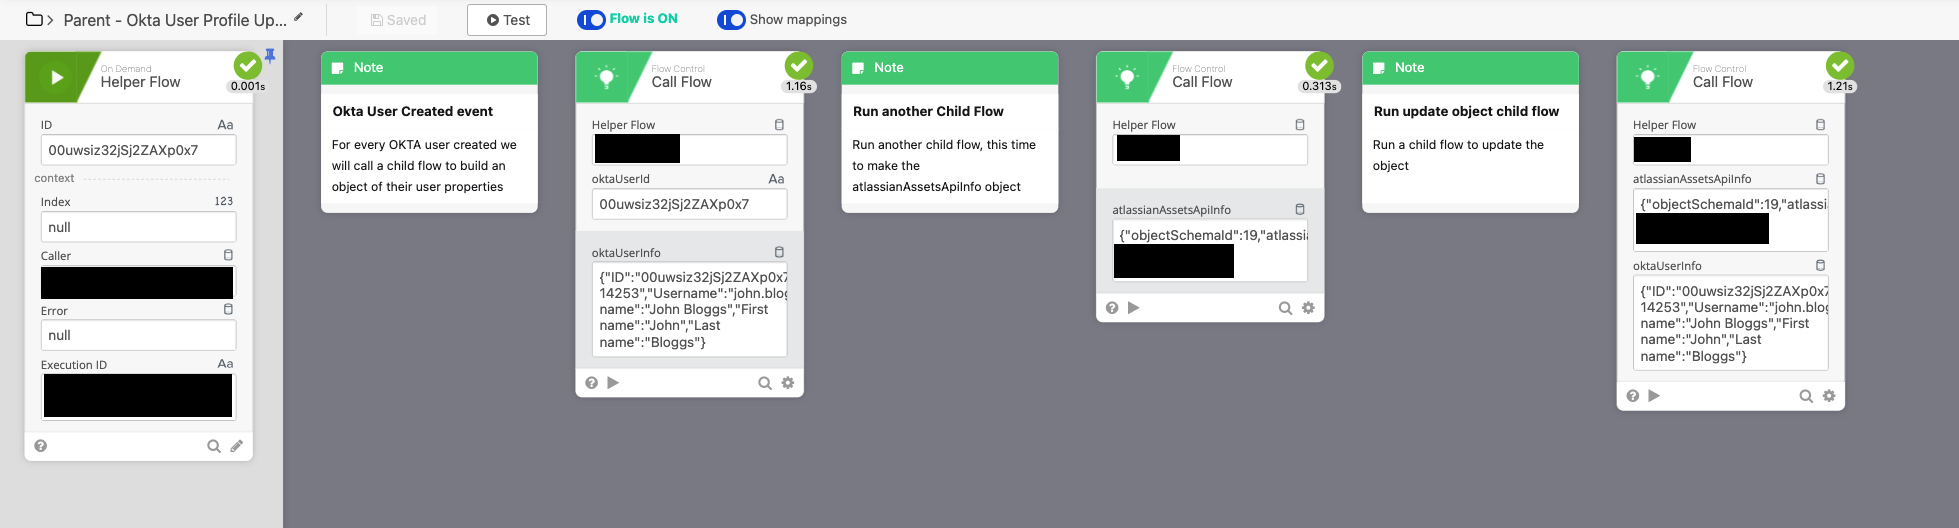
As before the 'Make oktaUserInfo object' flow was called and returned an object with information about the user. Then the 'Make atlassianAssetsApiInfo object' flow was called and returned an object with information such as the Workspace ID. After that we called the flow 'Child - Update Object'. This flow uses the 2 objects as inputs and updates the object in the 'People Demonstration Schema'.
The end result
You can see here the email and name were changed respectively.
Updating an existing object in Atlassian Assets when an Okta user is deactivated
For the final demonstration we are going to simulate what happens when an Okta user is deactivated, we should expect the object attribute status to change to inactive.
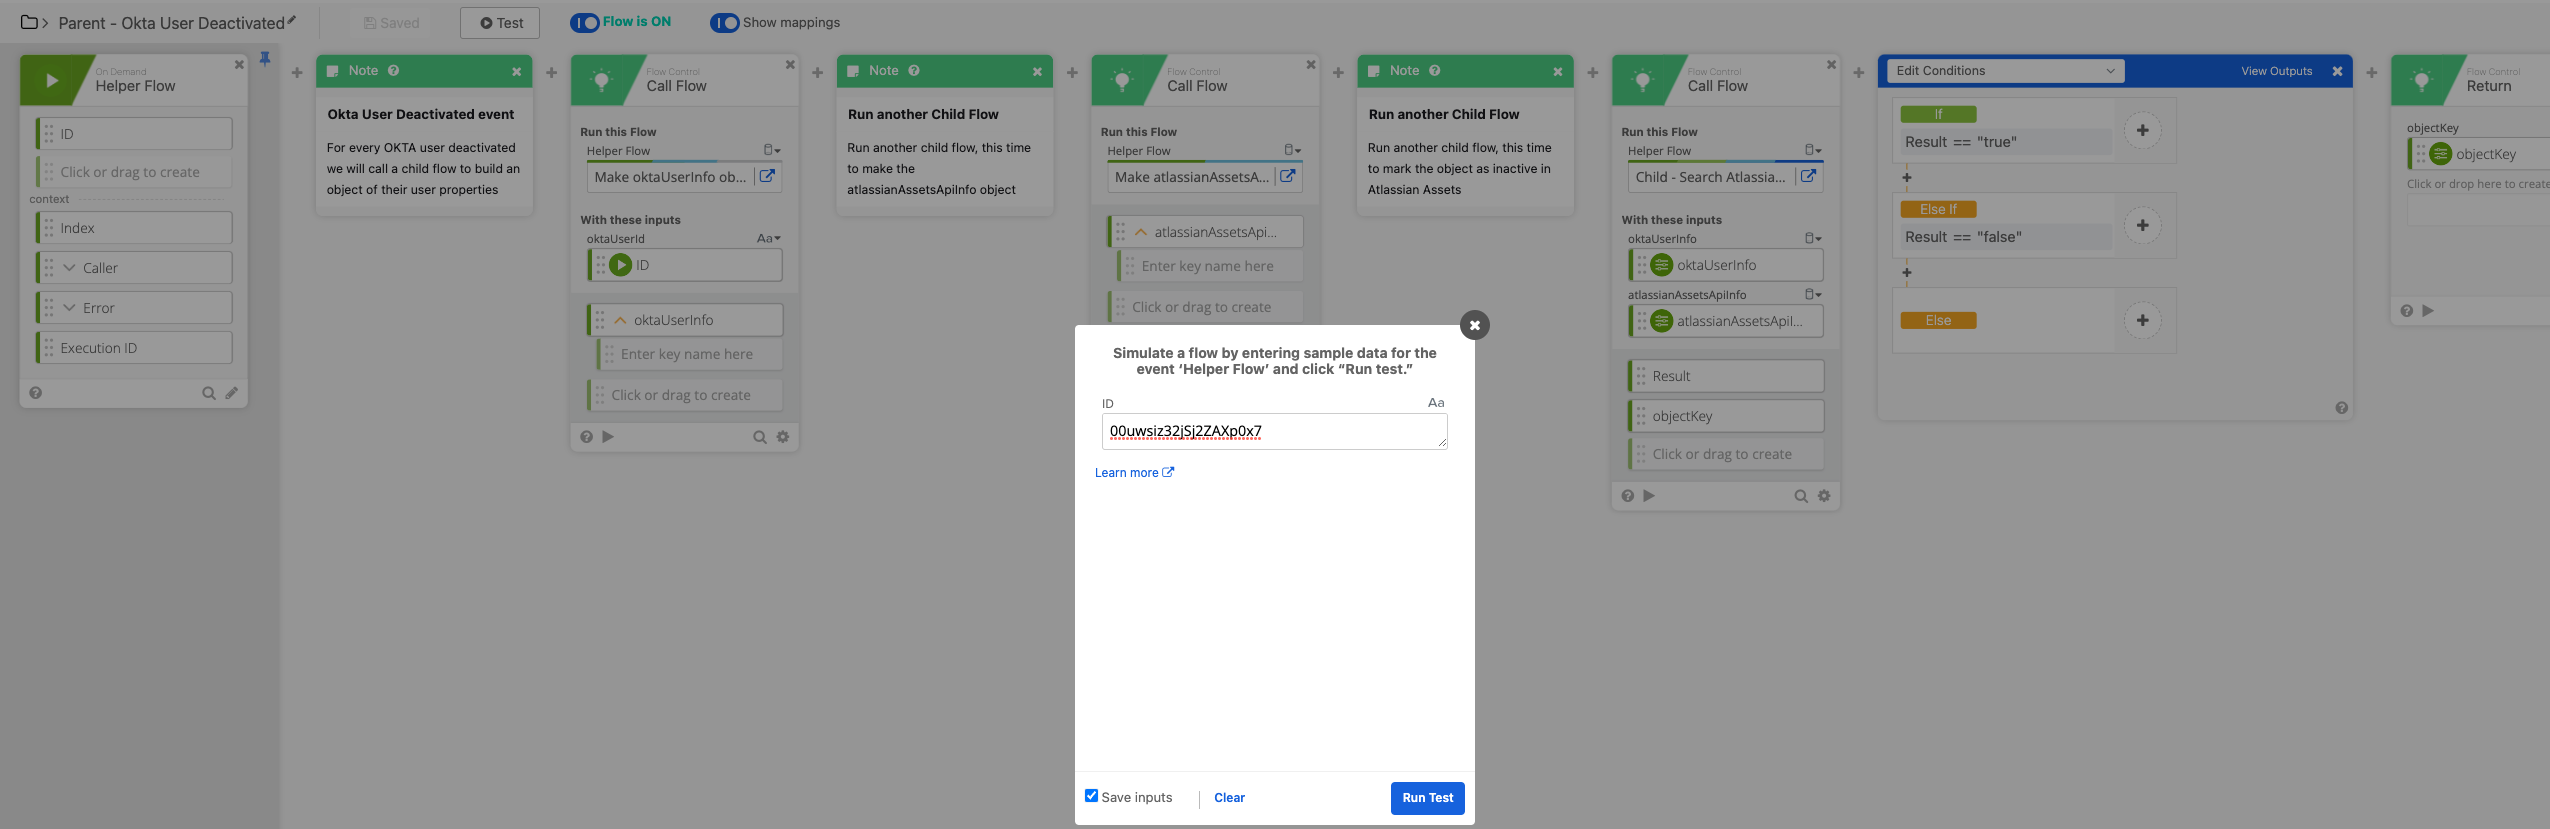
-
To simulate the Okta event of when a user is deactivated I am going to take the ID of the Joe Bloggs user and then use it to test the 'Parent - Okta User Deactivated' workflow
-
Let's have a look at what went on, we continue to create the same 2 objects 'atlassianAssetsApiInfo' and 'oktaUserInfo'. Then we search the Atlassian Assets schema to check if an object for the Okta User exists. Since we do have an existing object we get 'True' returned from our helper flow. Then we call a flow to update the Object Status, specifically using the value 'INACTIVE' for the mode variable.
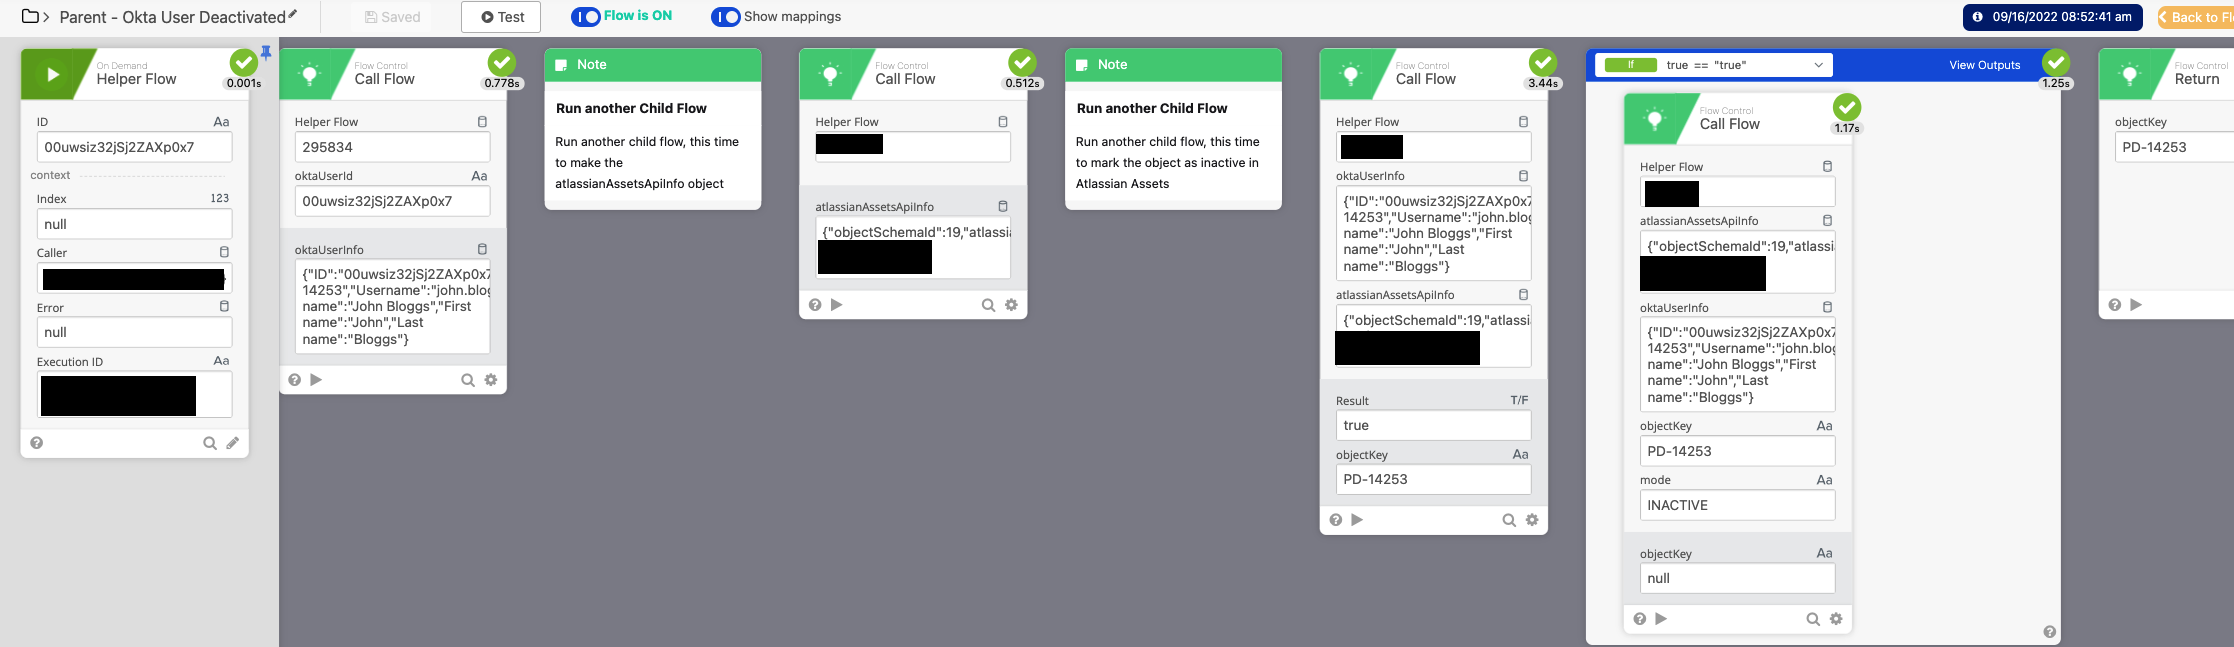
Let's look at what happened specifically in the key helper flow.
As per usual we unpack the input objects, then we split the objectKey into a list as we want the content after the '-' hyphen.
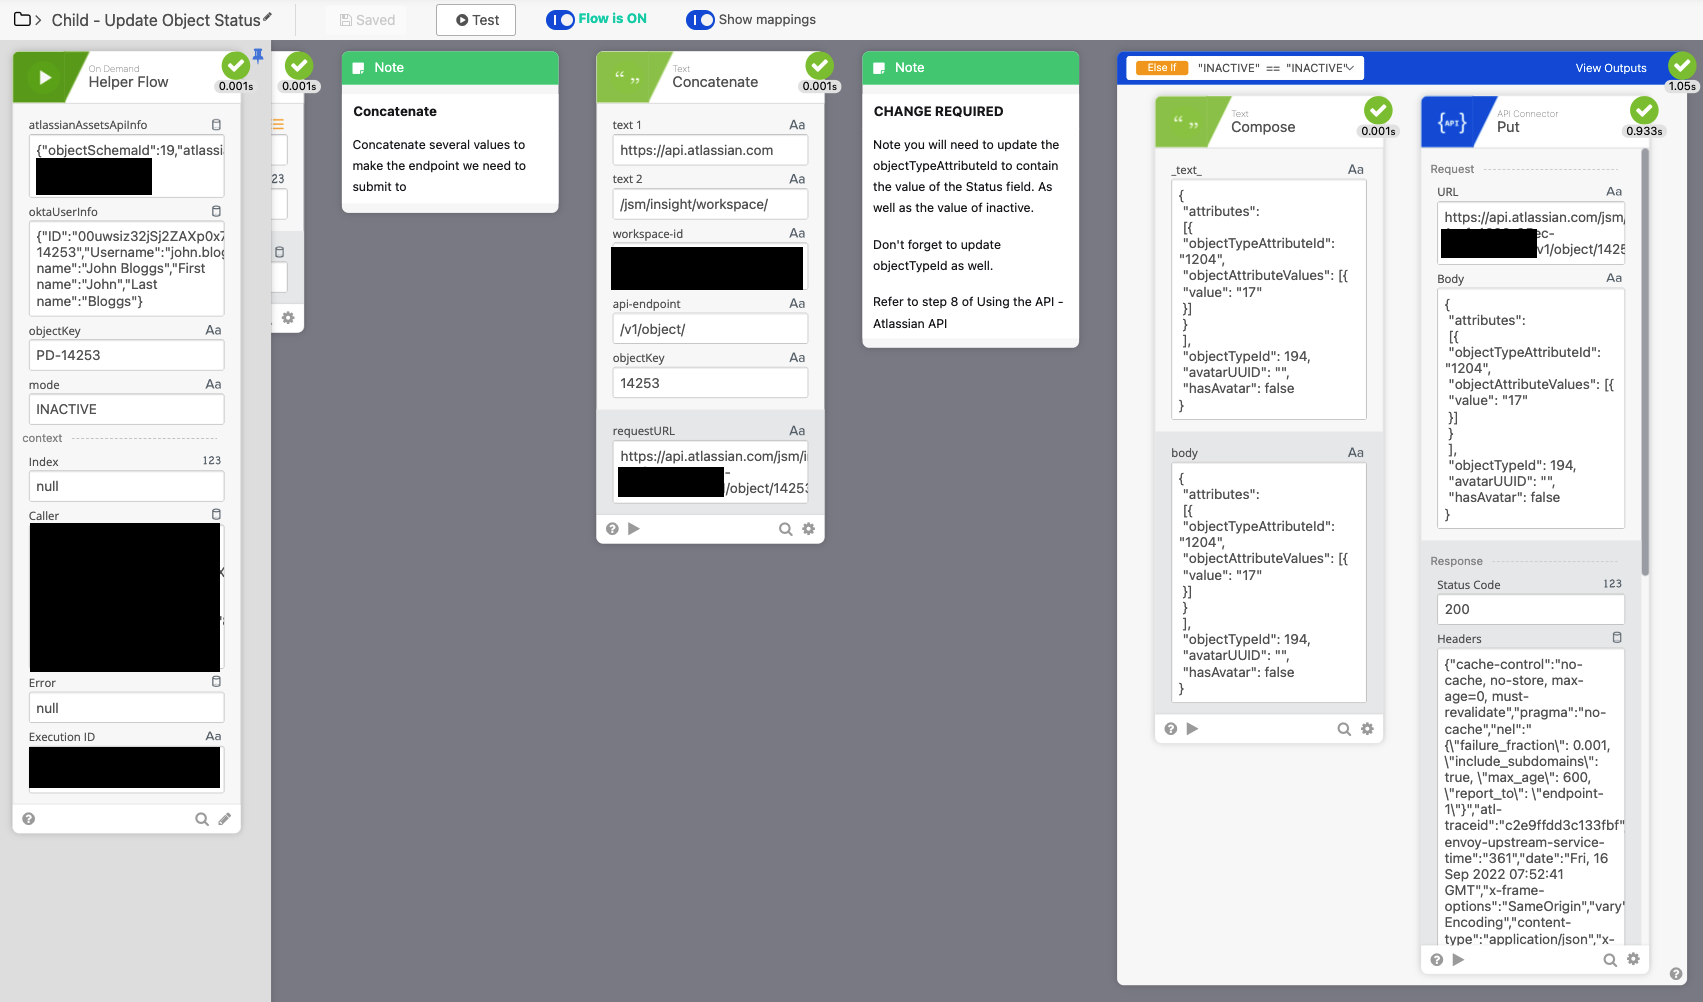
Then we make our request URL. After that we have an If / ElseIf for our 'MODE' variable, ignore where it says 'INACTIVE' == 'INACTIVE', Okta Workflows really should say 'MODE' == 'INACTIVE'. For this Else If branch we write out a request body with a single attribute, we are using the value '17' to represent inactive. Previously we used '15' to represent active. We then PUT to the URL we previously constructed and include our request body.
The end result
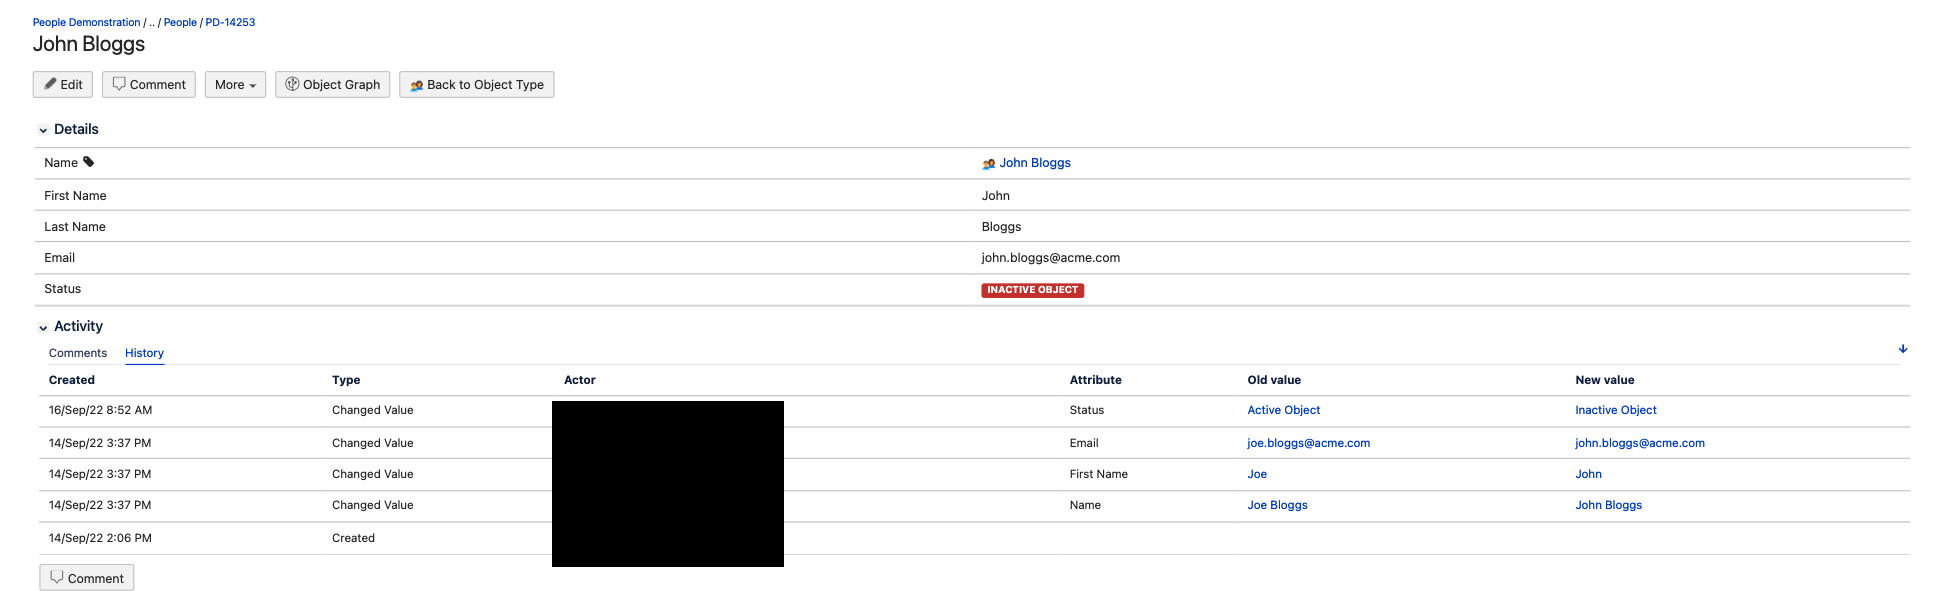
As you can see John Bloggs is now inactive.
Wrapping Up
It's been a long one, thanks for reading up to here. You may have already thought of how you can use and improve these flows e.g adding default values to use when an Okta User Profile Attribute such as Display Name has no value. Or by using the objectStatus attribute as input with an If / ElseIf branch in the 'Child - Create Object' flow. Please also think about how you can manage all your other assets in Atlassian Assets, it's so customisable and you can all have your relational objects tied together.
I would also ask you to think of how you can integrate your physical device assets with these workflows, do you want some automation to generate those objects in Atlassian Assets and then have some scripts on the devices to send information to a lambda function or a workflow and then associate the object with the 'People' object. I had a tiny stab at this but it needs some more thinking.
For support or questions please reach out to me on MacAdmins Slack in the #okta-workflows channel, happy to chat!